Remote Access 1

Good Morning from my Robotics Lab! This is Shadow_8472, and today, I have a lot of progress to report on remote accessing my computers from each other. Let’s get started!

I spent most of my time for the blog this week in that workshop I joined a few months ago. A lot happened, but I am not the main mind who put everything together, and I don’t fully understand everything that’s going on.

This week, I gained the ability to log into Derpy, my secondary Minecraft server/Linux testing platform, from another computer using TightVNC (Virtual Network Computer). TightVNC is one of many desktop viewing applications; most others cost while I’m working with a free version.

The first step was to set up a server on Derpy and get another computer to try and connect. We eventually ended up with a “gray” error screen with a black x pointer if we had everything working as best as was possible (it was actually a complex pattern of black and white pixels).

Part of the wonkeyness of remoting in involves screen parameters, like size and this one I know nothing much about called color depth. Something along the way likes a color depth of 24.

While we tried a few possible fixes, multiple places said to put GNOME on for the graphical interface. While I find the Cinnamon nice and convenient, I am more than willing to explore something new to find something that works… GNOME surprised me with that pesky zoom in thing I abandon Unity over.

I did a bit of research, and the popular Unity environment is built on GNOME. I hypothesized that Unity had changed something Cinnamon couldn’t care less about. None of the normal zoom in fixes worked, and the text had their smooth, vector based look, even though they were huge, so we knew the picture was at the correct resolution.

Over an hour of pointless guesswork later, I had outsourced the problem to a Linux support Discord server. After no response and someone else’s problem getting solved, I reuploaded along with a photo of the screen this time. Over the next three minutes or so, a couple users by the names of MotherM and ~> yay -s Superuser went back and forth trying to figure it out until a user by the name of PlasmaPower offered a command to restore the correct interface scale factor to 1 where Superuser had identified it as at a factor of 2.

gsettings set org.gnome.desktop.interface scaling-factor 1

With GNOME functioning properly, I was able to make a connection and even managed to open the Minecraft server remotely. However, any new graphical programs, including terminals, opened up in the host machine. It turns out, using TightVNC server hosts an extra login session, at least the way it was set up. Before I left the workshop, we got a script set up to automatically start the VNC server whenever the computer restarts.

Later, I figured out that if I logged out from the host machine, newly opened programs work as expected. I also eliminated one of my dual hypotheses. New programs prefer to open locally before yielding to remote sessions when dealing with multiple logins from the same username, not the first session started.

As it stands, the connection is stable. Future improvements may include sizing the resolution to fit my secondary monitor and getting a version of GNOME installed I can relate to a little better. I should also be able to set it up for CLI mode only for the host terminal.

Final Question: Linux is apparently the hardest OS to get set up for remoting into. When was the last time you reached the finish line, only to find out you were doing it the hard way, even if the easy way wouldn’t have worked for you anyway?

How I Prefer to Deal with Griefers

Good Morning from my Robotics Lab! This is Shadow_8472, and today, I am using some kind of new WordPress backend interface to tell you a story this week about something that happened on a creative Minecraft server I run. Let’s get Started.

A while back, I did a project where I revitalized an old, boat race minigame from a previous season of the Minecraft server I play on. I set up a private server to test this operation. Later, my family started projects on that server for others to come in visit before they were built for real. Part of the boat race required people to have OP privileges to work, and not everyone knew about the work on the race. Those that knew ended up being those with OP privileges.

Last week, I heard a report of confused member wondering where the warp points to the different projects went. I logged in and found tell tale signs of explosions around spawn. The pad with all the warps was gone, its command blocks smashed.

I found a name and what looked like a method of destruction. This person had gotten an advancement related to spawning the Wither Boss, a very destructive enemy in the game, and thought it didn’t quite look like a Wither Boss’s direction of destruction, it was close enough to get me to pursue that line of investigation. 

My mother was my primary ally this time. Over the course of a day, we questioned the suspect and assembled a story out of they told us. Apparently, a younger sibling had logged in from school with her account, having mysteriously gotten the IP from somewhere, spawned the wither, [smashed the command blocks], and left. Later, they logged back in and quickly left, fearing they were being framed.

The story didn’t seem quite in line with what the command line was saying, but with only a mouse on Derpy Chips, the computer the creative server is hosted on, things were going a bit painfully slow. I found the IP the griefer was using, and an IP associated with a legitimate access where they had a conversation in chat. The IP’s matched. I know a little about how IP addresses work, but I’m no guru with them. What it looked like to me was that I was getting the IPv4 of the ISP (Internet Service Provider) for the city they were in, and that that was a dead end for investigation for the time.

No matter the story, I was already thinking of how to fix the mess. I knew I had several, old backups and I could just use some of the files from good files instead of the griefed ones. I set Derpy up for work, but found it impossible to easily move the needed files from the latest backup to a copy of the current world.

I thought it would be a good time to try working on my next blog post (today’s), where I wanted to set something up so I didn’t need to ever switch screens and controls around again. Long story short, I tried to plug a different keyboard in from another computer, and it worked. I moved the appropriate files to the copy and had someone look at spawn… and it was the old, bland spawn. I didn’t have a copy of the nice spawn that got ruined. Oh well.

Meanwhile, my mother was still suspicious of the prime user of the grief the account that did the deed. I went chatting with them late at night, getting their story out of them in text before eventually pointing out that it didn’t match up with what I remembered of the logs. I went to sleep, and in the morning, I found a full confession. It was TNT, the wither skull was just meant to look cool, and the self-given command block I had originally assumed had been used to kill the non-existent Wither Boss was a red-herring. They were the guilty party, and they were truly sorry.

In that moment, I felt sort of like how a villain might describe the rush they get when they have their foe begging them for mercy but are still going in for the kill, but my only I thought was to forgive the party who had wronged us. It took me a while to word my response, and my mother had actually gotten back to them before I could respond, but we all were leaning toward forgiving them. OP privileges were revoked, of course, but while flying over the destruction, I was thinking to myself, ‘That would make a really nice lake if it were properly decorated.’ We asked them to repair the damage as a friend.

I was most surprised at their reaction to being offered forgiveness. They were expecting us to get mad, toss around bad names, badmouth them, ban them, and hate them forever “to put it nicely.” I honestly cannot relate.

We asked for a chance to share God on this server, and we can hope that they go and do likewise.

“‘If your brother or sister sins against you, rebuke them; and if they repent, forgive them.'” (Luke 17:3 NIV)

Final Question: Have you ever been forgiven of something, or been a position to forgive someone seeking forgiveness?

Stress Testing PLA as a Raspberry Pi Case Material

Good Morning from my Robotics Lab! This is Shadow_8472, and today, I am running a looping Hello World program on my Raspberry Pi for a while to see if my work for the last few weeks needs to be redone in ABS plastic. Let’s get Started!

I’m going with the hypothesis that while the Pi may run a bit warm for PLA plastic, with the heat syncs, and ventilation, I should be okay.

My procedure will involve using an infrared temperature sensor I borrowed from the workshop I joined a couple months ago. After messing with it for a while, I figured out how to use the temperature probe that came with it. I’ve taped the probe in the space I’m most concerned about overheating as I don’t have a line of sight view of the place.

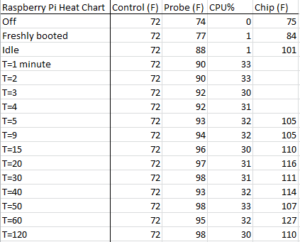
Each data point I take will track the ambient temperature of a consistent point nearby, the temperature of the probe, the CPU speed, and some points will take the temperature of a chip on the inverted Pi’s exposed underside, but only when data points are coming in after 5 minutes or more.

***

I’ve started collecting data. The probe wire is notoriously difficult to keep in place. I took data points while it was off and freshly booted. Nothing much changed temperature wise except the chip getting a little warmer. I’ll include a screenshot of my results later.

***

It’s part way through data collection. I may have skewed the results of collecting the data on the chip on the top side by measuring at a different angle. Ambient temperatures are fairly steady but the probe location below the heat syncs is slowly climbing. I just took another measurement, and the possibly skewed one doesn’t seem like I’ll need to throw it out after all. I was hoping it was my readings and not a temperature spike. I’m also concerned that the probe may be slipping, especially if it’s getting closer to the heatsink.

***

The probe was slipping! Its readout was growing steadily as the tape holding it in place gave way. My data at T=40 minutes and on will have it correctly positioned.

***

***

Estimates of the low end for PLA softening are around 60 degrees C or 140 F. In conclusion: While I believe my data has a large margin of error, I do not believe it is so great as to void my conclusion that it is safe for my case to operate my Pi under these conditions.

The Pi only ever reached 33% CPU usage, I believe it was throttled by the task of writing to a command line. If it were to run hotter, the plastic might still be in danger. I will need to redo this test when I’m running image analysis on it.

Final Question: How else can I improve my tests?


A New Tool Part 13

Good Morning from my Robotics Lab! This is Shadow_8472, and today, I’ve finally completed the construction of my New Tool!

I believe it’s only appropriate that I write this post on the computer in question, a little Pac-Man themed Raspberry Pi system I’ve named Blinky Pie.

The work this week was actually fairly simple. I stopped by a local hardware store with the Pi and the case to pick up two screws, and the guy who helped me was very knowledgeable. He helped me choose screws that were big enough to hold the board, but not so big as to crack the printed plastic.

Before I did my final assembly, I did a dry run where I taped the camera in place across the top of the dome and down the other side, and it worked pretty well, so well, I only had to add a final piece to keep the camera secured.

I took the camera out to finally install the two heat sinks that came with my Raspberry Pi starter kit, a task my father was happy to help with. After that, I installed its ribbon cable around the back of the board where I could install it with the screws I picked up earlier after making sure the camera was installed correctly. Of note, I have been having a lower rate of failure when installing that thing lately.

While celebrating the final completion of the base hardware for my tool, I ended up exploring some settings on the GUI, specifically the task bar, or as Windows would call it, the Start bar. I found a setting to customise the color, and about a setting for about everything you could think of and double it. The term is called “decision fatigue.” There are so many settings, you can spend, and have to spend an hour or two to get everything looking OCD compliant. One glitch preventing using the “icons only” setting from save space has a workaround of moving the task bar to a side and back again, but that throws a bunch of other settings into chaos, mainly the height of the task bar, and guess who doesn’t have a “restore to defaults” button!

I’ve run multiple tests with the Pi idling in the case before its final installation. I’m pretty confident the case won’t melt. It’s well ventilated by the heat-sinkable chips. I even ran the dry assembly for a few hours, and the plastic around the stock board with out heat sinks was only warm.

Final Question: Besides feline repellent, what other applications can you think of for a Raspberry Pi with a camera?

A New Tool Part 12

Good morning from my Robotics Lab! This is Shadow_8472, and today, I am finally done with the paint job. Let’s get started!

I had to give in. Spray paints are just too broad of strokes for the delicate eyes. I ended up recruiting my sister to do them with acrylics. On the plus side, they are a slightly closer shade of blue to the original sprites, which I was going for, anyway. I booted up the Pi after the final bits of paint were dry, and confirmed a clear image from the camera. I snagged My father to clean the whole thing with rubbing alcohol and the two of us applied a clear coat.

As of this writing, I have spent an hour or two working at removing that Elmer’s glue mask. I waited too long, and the mask is too thin. If I ever need to mask off another waffle cone like that again, I’ll spend less time using masking tape beforehand than peeling the glue afterword. The Elmer’s glue trick is only for small details!

The paint job is not as perfect as I’d hoped. The white iris has a little bit of blue in it and there’s a little chip in the paint on the back. A bubble or three have grown in a few places about the surface, and the final irises have brush strokes. Even with all these small flaws, it still looks better finished than it did while stuck in development limbo. Overall, I’d say it’s almost what I wanted.

As it stands now, I have most of the glue off, but the rest is either splitting on me or stubbornly sticking to the printed plastic. Fortunately, the holes I taped off remained taped off through the whole ordeal so I didn’t have to go through and find a hook to get blobs of glue out of all the deep crevices.

Looking forward, I hope I don’t need to use an Internet connection to recognize a cat. I honestly don’t know how long it will take to finish with the software side of things, but I will need to first make a “Hello World” program to debug my coding setup. Come to think of it, I likely only have one more “A New Tool” post, as it’s just going to be attaching the board and any little details that pop up.

Final Question: have you ever had a long project finally approach its completion date after crawling along for way too long?

A New Tool Part 11

Good Morning from my Robotics Lab! This is Shadow_8472, and today, I’m reporting the trickle of progress on the Pac Man Ghost Pi case. Let’s get started!

When last I left off, the paint needed a little sanding to get rid of brush strokes. I used 1000 grit sandpaper on it, but I ended up smearing the blue touch up paint onto the white iris. Additional sanding to get the smudges and strokes off the white rubbed straight down to the red plastic.

I ended up having to repaint the whole thing. Dealing with paint on this project has been a two-person affair, and my father has been quite busy any time I’ve been thinking on the project, and time to dry just compounds the problem.

The first layer to be redone was the biggest, red body of the ghost. As a pro-tip, my father showed me how he peeled back the masking on the eyes a little to get that bit more of coverage. From a diagram I saw some months ago, I believe that will help avoid a hard line in the final product after all the tape comes up and everything.

The second layer was the whites of the eyes. Nothing much special happened here, except the eye holes were covered with tape this time. To my dismay, my father explained the correct tool for the job if I wanted to spray the eyes on. It turns out an Air Brush is a lot more handy than a full spray can, but he did figure out why it didn’t work so well the first round of touch ups.

The solvents in spray paint evaporate quickly, so he maximized the amount of solvent by spraying upside down to get some extra propellant, as well as use some mineral spirits to help combat premature paint clumping.

As it stands now, there was a little bit of an accident with the blue spilling into white territory. Without an Air Brush, it looks like I will just have to endure a few brush strokes on an imperfect surface. At least the clear coat will still protect the looks it does get in the end. The whole thing is already looking awesome, but my dream of it looking absolutely perfect is something that will need to wait for a bit more experience.

Final Question: Have you ever wondered why you couldn’t do something, only to realize you don’t have the best tool for the task?

Headphone Repair?

Good Morning from my Robotics Lab! This is Shadow_8472, and today, I am trying to fix a pair of headphones that popped a joint while I was off on vacation this week. Let’s get started!

I’ve had this set of headphones for a while now, and I’m not always the most careful with my technology. I often leave them on top of my cluttered desk or computer tower, and the household cats often pilgrimage to the window behind my desk. Be it from my cat or my klutz, the headphones often would wind up falling to the floor, and I would count my blessing when they still worked each time they tumbled.
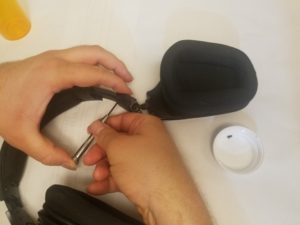
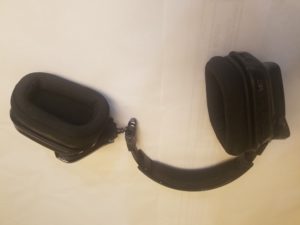
Typically, I’ve had headphones fail at the micro-USB connection from the wire to the headset. This time, I stuffed them in a backpack along with a couple other laptops and a keyboard. Sometime between home and our second hotel, one of the sides had popped out, likely when a dog crate shifted into the backpack momentarily. I tried to push the piece back together, but I was afraid of damaging it, partly because we’d had the opposite problem happen to one of our dogs’ Gentle Leaders (a training tool worn on the dog’s head).

With the lack of enough progress on the Pi case I’ve spent months slugging on about, I noted the lack of broken-looking individual parts on my headphones and decided it wouldn’t hurt to disassemble the hypermobile joint and put the whole thing back together correctly.

I started by removing the four… three of the screws holding what was left of the wayward side together. The forth one was a little stubborn, but it eventually came out. The piece itself had a little more resistance, so my father and I coaxed it out gently.
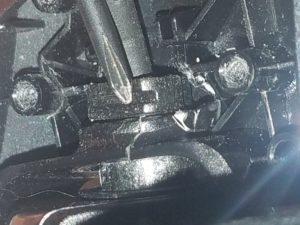
Exploring the inside was a little disappointing. The first sign this wouldn’t be a successful mission was the tweaked, plastic fingers meant to hold onto a grooved peg (helpful for) earpiece rotation. Additional bad news came when I spotted an actual crack in one of the brackets.
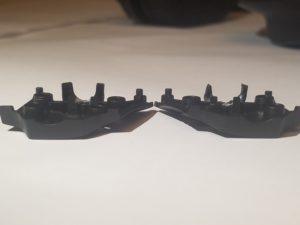
For the purposes of the blog, I decided to pull the other piece off for comparison. Remember all those drops? The teeth on the “good” removed piece were well on their way to deforming in the exact same way. The backpack getting crushed must have affected only the one side and was either enough to finish the job or do it from scratch.
Either way, I won’t be able to repair them as I’d hoped. I wouldn’t trust my 3D printer with something so delicate, and even if I did, I don’t have a pattern or a way to scan the “good” piece (so it can be mirrored). The plan is to screw the pieces back where they go and either cache in on a warranty or save them for parts.

Final Question: Have you ever had to back out of a repair project when its apparent difficulty level spiked?


A Spot of Network Maintenance

Good Morning from my Robotics Lab! This is Shadow_8472, and today, I am scratching around for something to talk about and I’ve come up with reviewing a home network crash this week. Let’s get started.

Years ago, I was staying in the dorm at my university as a Freshman. The walls were concrete, so they didn’t have the campus WiFi installed. If you wanted your own WiFi, there was a hard rule: “Absolutely no routers” because it messes with the network. Instead they had these wireless access available from IS (Information Services, the local version of IT). Each room had two Ethernet ports (and two disconnected phone connections thrown in for free), and even though I was alone in the room, I had my desktop, laptop, and now an access point. Hard wire is much better than the unreliable WiFi, so I ended up picking up this Ethernet switch.

An Ethernet switch is a step above an Ethernet hub, which was also allowed. While a hub just repeats each signal it gets to all the other connections, and the wrong connections ignore them, a switch directs signals to where they actually need to go. I ended up with an eight way switch.

My switch served for the next few years and eventually got integrated into my family’s home network system, where it’s been serving with all but one connection for a while. This week, the Internet cut out on us, all devices at once. My father was the one who actually talked to tech support, but after they told him his router was bad, he did some additional diagnostics, which pointed to my switch having failed.

My mother and I went to buy the replacement the next morning, and I was a bit perplexed when I opened the box. The old one was simple: plug and play. This new one comes with a CD, and an instruction guide for setup that doesn’t even work straight away with Linux. At this point, I’m getting conflicting impressions: Linux is king in the server world and prominent with people who are into computers, but they only seem interested in catering to Windows users.

I ended up ignoring the fancy setup for now and tried plug and play. It works. I cannot imagine why they would not list that as an option. It would have been a bit less frustrating if they had just said so right away and stated their extra software as “optional, for enhanced performance” or something like that.

Update: As I was finishing, the Internet dropped out again. After it’s stable again, I may want to take another look at my switch to see if it was working all along. In the meantime, a router reboot fixed it for now.

Final Question: What was the last piece of computer hardware you wore out?

MineCraft 1.13 Cave Spider Farm Design

Good Morning from my Robotics Lab! This is Shadow_8472, and today, I am taking a break from the regular content on my blog and doing a tutorial on this easy Cave Spider XP farm I’ve developed with a little help. More on that later. Let’s get started!


Minecraft has a small zoo’s worth of farmable mobs, but one of the most challenging is the Cave Spider. With its ability to climb any surface as if it were covered with ladders and its tiny hit box, able to slink through all but the most airtight of hastily built walls, these pests are native to abandoned mineshafts, and nowhere else. The only reason anyone might even consider a Cave Spider XP farm is because of how often multiple spawners can generate close to one another.

.
This tutorial assumes you’ve already found an abandoned mine shaft full of cave spider spawners. Once you have a bunch of spawners captured, write down or take screen shots of each spawner’s coordinates. Remember, mob spawners only activate if you are within 16 blocks, so the farthest apart two spawner blocks can be is 32. If you aren’t sure if two blocks are in range, use the Pythagorean Theorem generalized for three dimensions, √[(x1-x2)²+(y1-y2)²+(z1-z2)²].


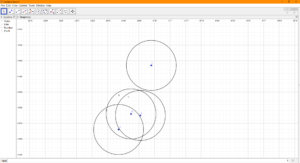
If you are looking to develop more than two spawners, which is usually the case if you are going to go for cave spiders, you’ll want to actually graph their x and z coordinates to filter out the false hopes a purely Pythagorean approach can yield. I recommend using a Geometry program like GeoGebra. Draw a 16 block radius around each spawner’s point and look for overlap. Once again, this won’t give you any hard positive results, but it will give you a fairly good idea of what to expect and how big your spawners’ overlap area is so you can start designing your grinding room.

You’re mostly on your own for the next part, since there is a plethora of possible arrangements between spawners, collection systems, and collection points, but I can give a few general tips.
Spawners won’t spawn mobs if too many are within a 9x9x9 box of the spawner block, centered on the exact middle of the spawner block. For maximum efficiency, drop your spiders down four blocks, then at least another two and into a water collection system.


Cave Spiders’ alleged super powers end when they can’t stick to ceilings. We can exploit this by using Iron Bars, Glass Panes, or the like to make a little overhang they can’t climb past. (From here on, whenever I say, “Iron Bars,” just use the narrow block of your choice.) To keep them from climbing into a corner and building up, we can use flowing water at the top to push them off the wall.


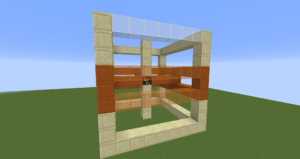
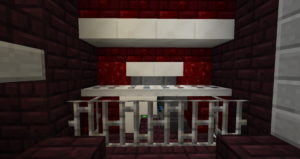
Here’s a cross section of my personal collection system. Important notes include highest part of the floor (the system need not be perfectly symmetric) is 4+2 blocks below any spawner above it, There are no water source blocks in the collection area itself, and the final water flow ends on the Iron Bars. Build the middle of the trough similarly, digging down whenever you run out of water instead of adding sources. The pistons are for a gimmicky lighting system I only recommend for those brave enough to deal with lava lighting.


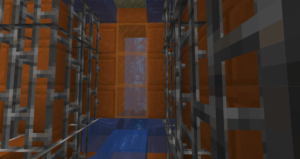
My main innovation for this tutorial was this part right here. By lining the top of the transportation tunnels with top slabs (Trapdoors/Iron Trapdoors should also work and look nice), we don’t have to dig out so far to get that little tip of water to push the cave spiders back; a source and single flowing water should do. Once you are in the tunnel, feel free to use water sources whenever you drop the floor.


When you get to a corner, drop the waterline again and add a source block. On the upper “water rim,” be sure to use an upper slab so the spiders don’t get stuck on a quarter of an exposed block. Just carry the inner corner around the turn, but be sure you don’t accidently turn your flowing water into two lines of source blocks.


Here’s a picture of a Cave Spider grinder design from SteelToad, a colleague of mine from the server I play on. The Spider input is two wide, so I like to put a two wide soul sand bubble elevator in line with it and pipe them directly to the kill chamber.


Back in the plumbing, the entrance of the elevator is only a block wide. Unfortunately, we’ll need to use a pressure plate or sign to contain the elevator water and rely on the spiders pushing against each other to move things along. While we’re at it, we can lose the bars by adding water streams from the sides to guide the cave spiders into where they belong.

A final note: If you plan on any serious AFK time, be sure to include an auto killer switch. When I built this in survival, I used pistons to change the direction the elevator sent the spiders. Other than that, add whatever you want in a Cave Spider farm. Just don’t get too close to the spiders when whacking at them, as they can still occasionally bite.

Final Question: What other design improvements would you add?

A New Tool Part 10

Good Morning from my Robotics Lab! This is Shadow_8472, and today, I am covering the finishing touches of the physical side of my new prototyping assistant. Let’s get Started!

I left off with the glue mask drying on the ghost’s foot area. When I peeled off the tape from around the stuff I actually wanted to paint, I ended up pulling bits of the glue mask off along with it. I ended up spending the week touching up the glue and waiting to paint the foot.

The lower half of the Pi case finally did get painted, but at present, I am waiting to put a clear coat on the whole thing. Order of operation keeps getting in my way, though, as the upper half of the case needs some touch up paint from where I goofed on the original masking.

In other news, I went to that workshop again. I hooked up the camera to the Pi and had it look through the pinhole. I was expecting a blue haze around the picture’s outer rim, but somewhere in the process of painting, likely when I was first painting the blue pupil and I stuck a pin in it, I must have expanded the hole just enough so it doesn’t show.

To finish this week’s project (late) I just need the touchup finished with a paint brush, a light sanding to remove the strokes, and a clear coat to protect the paint. After that, the foot’s masking can come off and I can mount the Pi board and tape the camera in place. As the file I printed up is meant for a slightly different board, I will only be able to use two of the four screw holes that align at once. I’m slightly worried about too much torque on the Pi’s circuit board, but if I’m always careful, it shouldn’t be a problem.

Final Question: I’m slightly worried I won’t have enough to write about when I get around to programming the thing. Will you be up to more technobabble style posts when they come?