Good Morning from my Robotics Lab! This is Shadow_8472, and today, I am sidequesting into the world of drones for my first actual bot. Let’s get started!
I was seriously considering going for the PIXXY platform for what seemed like the longest time. Right now, I don’t know where I stand on what to build. I just want to find something I know I won’t run out of non-printable parts for. PIXXY appears to be a dead platform at second glance as many of the parts listed for it 404 on me. I’m willing to look into alternative parts for the same platform, though.
***
The first penetration attempt into the field was a big let down. Preassembled drones can run cheaper than the electronic goodies needed to build an open source design, and I am not ready to design my own chassis based off a stripped down model, or even a kit. The experience felt a little… bitter, even if it was only over the phone.
On the other hand, getting a preassembled drone would give me a quicker feel for how a drone is supposed to fly.
Another thing to consider: replacing a drone from a factory will cost more if it breaks than printing up a single replacement part. Besides, one of the rules I laid out for myself is to only use free, open source stuff whenever possible.
***
OK, OK, I gave it some more thought, a prearranged kit (not preassembled) wouldn’t be so bad if all the parts are standardized anyway. I would still want to make sure the parts are ones that will fit with whatever drone I decide to print.
***
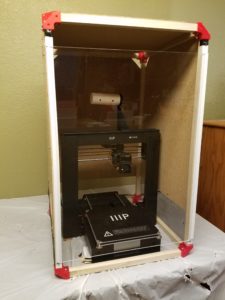
I didn’t seem to come to any substantial conclusions this week, but my father and I did finish the temporary case once and for all. The breathing holes on the sides have window screening stapled to them and we got some cheap J channel to hold the door, which is now a slide up model. Screws hold the rails for the door in place, and a little black duct tape protects the clear panel from further scratches as it slides.
Final Question: If I don’t go with building the Pixxy, what printable model should I go for?
Good Morning from my Robotics Lab! This is Shadow_8472, and today, I am finishing my 3D printer’s case. Let’s get started.
Last week, I printed the brackets, and oh, did that thing drone on and on. I’m not looking to print anything else for now, so I finally unloaded the filament and put it away. PLA filament is supposed to be stored in an airtight container, and I am fortunate a gallon Ziploc bag can barely swallow it. One tip I heard when first researching 3D printing before setting the printer up: on the side of the spool, there is a place to feed the filament so it doesn’t tangle while in storage.
Besides the brackets, my father and I are using some cheap wood for the frame and some spare Masonite panels for the siding. The door is being made of an acrylic sheet. Instead of hinges, I’m planning of making it slide out the top.
Construction this time has been much more straightforward than previously. We used a skill saw to cut three six foot pieces of 3/4 in lumber down to size… “Measure twice, cut once.” Good thing we bought extra for stock. Of course, after sending the ‘finished’ pieces back out for a round of quality control on the skill saw, we assembled the frame with the stunted, vertical edges. Those got swapped out after inspection. Had they gone unnoticed, the filament spool would have required accommodation through the roof, defeating the whole point of the project; to keep the cats off the printer.
As stated before, the side panels are fashioned from some Masonite we had occupying garage space. We cut a couple of pieces to form the back, sides, and top of the case. The side and back panels do not reach all the way down. The gap provides access to the power chord, switch, and various ports on the side. The bottom panel is absent; if anything bumps the case, it is isolated from the printer and won’t transfer the shock as readily. The top corners are cut to facilitate ventilation and dodge the corner brackets. The front panel, will be different. My father and I have run out of time this week, but the current plan is to make a panel to slide out the top instead of a hinged door.
Over the course of this project, the materials at hand have not always lent themselves to the exact plan. The hardware store didn’t have appropriate corner brackets, so I ended up printing them. The calculations for the wood for the frame were actually made with the assumption of eight foot pieces, they came in six. It’s only when you look for hinges that you realize just how many choices there are and how many won’t work for you. Roughly nothing about this case is untouched by design revisions.
Final Question: What projects have you adjusted for available materials?
This week’s edition is available on my YouTube channel.
Good Morning from my Robotics Lab! This is Shadow_8472, and today, I am printing up the remaining corner brackets for my 3D printer case. Let’s get started.
This week, I decided to explore the different quality settings for my printer’s slicer program, Cura. As I start writing this week’s post, I’m printing out the third of eight corner brackets, each one so far sliced at different quality level. The only obvious difference is the time required to print. As I posted last week, I suspect the raft comes off more easily the higher the print quality, but I’m waiting on drawing final conclusions for now, since the easy raft removals were from .gcode patterns that shipped with the printer and I have no way of knowing what level of quality they were sliced with.
I’m also noticing this webbing stuff across crevices in all three bracket qualities. Judging by the print in progress, I’m guessing the infill is spaced progressively tighter on the higher quality prints, but the official call will wait until I have my final sample. Of note: the printer sounds fairly consistent no matter the printing quality.
***
Progress bars are wonderful estimation tools. The Printer has one. But I don’t think it measures progress in terms of either time or plastic used so far. There are times when it feels like the job is lagging behind schedule as it chugs through big layers only for the progress bar to catch up as it blitzes through smaller, faster layers. I believe the printer is simply measuring percent completion in terms of Z axis progress. Another easily programmable possibility would be to report percentage of the .gcode file executed. But exploring that question should be a topic for another week where I also cover learning the basics of Blender.
With that said, the third bracket just came off the printer. Toward the end, the printer screen dropped the print job monitor in favor of the main menu. What’s going on with that? End of .gcode file? I’ll need to keep that quirk under observation in the future.
***
The webbing seems to be about the same density and strand size no matter what quality I print on. The brackets each weigh in at .7 oz; if they differ at all, I don’t have a precise enough scale to tell. The rafts from high and normal quality jobs came off cleanly within seconds by hand, but the low quality raft split on removal, requiring additional cleanup later. The webs will also require some tools to extract, but the toughest thing about them is the tricky angle for fingers. The infill on the high and normal settings is the same, but the fast print is only 2/5 as frequent. Interestingly, the sides of the normal bracket and not the low quality one, are the roughest. Ironically the top tips of the corners of the “high” quality print didn’t stick correctly and broke off. In conclusion: I’m going to use the normal setting for the remaining brackets.
***
I messed around in Cura some more and I started printing the next two brackets at once. I wonder what the overall quality difference will be. The extruder tip is alternating brackets, laying a layer down on one then the other. It takes a little longer, but combining jobs saves time on resetting the printer. I can only guess that there will be a bunch of webbing connecting these print bed twins.
All the rafts for these brackets so far are triangular, but on all the normal prints, and only on the normal prints, one or two corners of the raft get omitted, including each of the twins. Messing with Cura again, I found the size controls to make objects bigger or smaller. Those get left alone for now.
***
The twin brackets are almost done. They do indeed have a bit of webbing between them, but it isn’t so bad. I’m not sure, but there might be less self webbing per bracket than any of the singles. I’ll need to run many more print cycles to know for sure.
***
Filming for this week’s presentation was riddled with challenges. I tried filming the twins, but I quickly ran out of storage on the camera. Bracket number six was printed on low quality so the camera could swallow filming it from start to finish. Unfortunately, the sun went down and the lights inside were off, so that take was botched due to low light at the end. The raft didn’t peel nicely either, instead it royally fractured along where bracket met raft. I ended up bumping the quality on the camera down a level to capture the single, normal-quality bracket number seven being printed. After this one is done, I’ll have one more to print up before next week’s topic where I finish the printer case.
***
Final Question: Do you know a lot about 3D printing? What’s going on with all these plastic fibers?
Good Morning from my Robotics Lab! This is Shadow_8472, and today, I am printing out the corner brackets of the anti-cat case for my 3D printer. Let’s get started.
The best projects are those that build upto higher existing goals. This week is printing files from online. The Cura software my 3D printer came with is apparently what is known as a slicer. From my research, you can model up any 3d object with as much precision as the limitations of your computer will let you. But in the end, the 3D printer can only print so small. A slicer translates a 3D object file of pure mathematics into a set of instructions for the printer to follow. For the purposes of this blog, Cura is a software extension of my printer.
There are two ways to get the sliced pattern to the printer. SD card, or USB cable. I don’t have enough USB extensions to reach the printer, so I’m operating on SD card right now. I only have one USB card reader on a modern machine, but I remembered one of our old computers in the garage having a multi-card reader. I extracted the module, but quickly learned there weren’t any appropriate internal connectors. The old computer in question was using PATA cables, which look like ribbons instead of the more wire shaped SATA cables of more recent years. Maybe in the future, I’ll see if soldering something up is an option.
I used the rest of my sample filament to print up a potential bracket to hold my 3D printer case. I knew I’d run out before the printer finished, but the sample produced was enough to know a finished version, even one scaled up to be big enough wouldn’t work. Of note, I told Cura to do a fast job on the piece, and I had a harder time separating the raft from the bracket. I’m going to do some more experimentation when I print up the upper corners. The regular print speed is estimated at 6+ hours and the fast at about 3+. Expect the full results next week.
The part I am printing for this project can be found here. The linked page provides the download and says it’s in what’s known as Creative Commons. While I don’t know exactly what that means, I understand it to mean the file creator gives permission to anyone to use their part for whatever purpose without royalties, even if it is part of your product you sell.
***
I have started the first corner, on fast, and it should take between 3 and 3.5 hours. I opened up my first full spool of filament. Setting up this job took longer than expected. First of all, the 1KG spool didn’t fit on the spool rack, so my father and I had to improvise a wide enough one. A more permanent fix may involve printing up a part to fit correctly.
I also had trouble loading the new filament. The instructions said to cut an inch off at an angle, and I did, but it kept having trouble grabbing it. The last, little bit of the white sample filament was still in there, so I set it up and told it to go. The thing started printing a ghost raft.
The filament wasn’t loaded properly. I tried preheating and loading a few times, but I told it to load, it kept making a clicking noise like it couldn’t grab the end. I had to cut it again at a steeper angle before the machine took it. The extruder oozed a white string that turned red as it went. I was secretly hoping to have the color change happen on the raft for the bracket, but seeing it working correctly was also good. In pulling the tangle away, the hot plastic formed a fine thread, as fine as human hair, though it didn’t feel as strong.
***
Half done, and no major problems remaining so far. I am noticing a bunch of places where the filament is forming like a web in places where it isn’t required. My guess is that’s the fast mode complaining a little. I’ll have to clean the visible ones out. I’m also not getting the Forbidden Planet feeling like before. Either I’m getting used to the sound of the printer or it’s the fast mode. Maybe I’ll print up one on each setting and compare them side by side. Weight, Raft separation, and print time should come into play. I should also take note which corner is which in the case one of them cracks while the case is being assembled or later during use.
Of note, some of my first builds seemed to have some stuff printed into them. I wonder if some stuff from my hands got onto the sample filament and the printer passed it.
***
The print job finished. I’m going to leave the raft on until I have the “normal” and “high” quality prints of the same job done. Final Question: I had to ward my cat off of my printer part way through. Have you ever had a pet almost hurt themselves on a hobby project?


 but my father and I did finish the temporary case once and for all. The breathing holes on the sides have window screening stapled to them and we got some cheap J channel to hold the door, which is now a slide up model. Screws hold the rails for the door in place, and a little black duct tape protects the clear panel from further scratches as it slides.