My First Astrophoto

Good Morning from my Robotics Lab! This is Shadow_8472, and today I have a follow up with my telescope. Let’s get started!

In contrast to recent years of drought and water rationing, this winter has seen the blessing of much-needed rain. Overcast often blocks out the night sky, and mist can ruin a clear night anyway. But Tuesday night this last week was clear, dry, and still. I took my entry-level telescope to the front yard.

One of my goals with telescope is photography. I wanted a modestly decent picture of Saturn before investing heavily in equipment. But Saturn is setting too soon after sunset to catch above my suburban skyline – Jupiter will have to do; before try that again, I want to get some good detail on the moon because my first attempt at astrophotography with a modified chair bracket failed when I couldn’t line up my small, pre-smartphone era camera well enough to locate the planetary system.

This time, I aligned everything before going outside and happened to aim the the parts I was holding at a floor lamp. Camera’s screen showed an off-center circle, and I adjusted the bracket’s wing nuts and bolts until it was centered, but even that wasn’t enough. Unless the camera looks straight down the eyepiece, it gets these funny “shadows” along one side or the other. It’s like looking down a paper towel tube – done right, you see a circle of light in the middle of your vision. Rotate the tube either way that isn’t the axis, and you get this sharpened oval kind of shape before you get no light at all. The bracket as is takes care of tilting up and down, but I still have to worry about twisting left and right. My current setup also lets me vary how deep to drive the bolt, but that gets ugly with wing nuts and rotation and everything. This is all in addition to another joint with two degrees of freedom originally included with the cell phone mount.

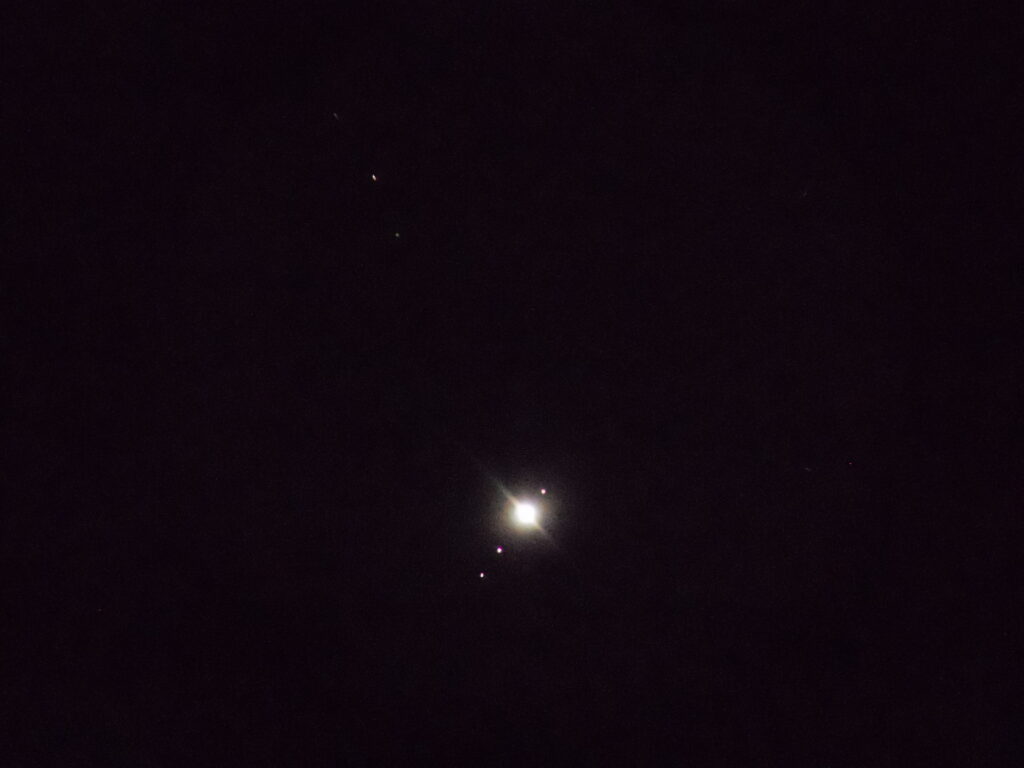
Outside, the moon was not up, but Jupiter was sitting high in the western sky. I aligned my star scope on the planet, and when I looked through the eyepiece, three of the four Galilean Moons on display. (From an online tracker, I later learned Io was transiting in front of the planetary disk at the time.) Better yet I found them in my camera. I set a 10 second delay and captured this picture at around 9 PM on February 27, 2024 (Pacific Standard Time).

I followed up with seven additional images at a higher zoom; they fell victim to distortions I believe were related to rotational misalignment between the camera and eyepiece which weren’t as noticeable at the camera’s lower internal magnification.

  • The ten second delay timer proved important as it took as long as eight seconds for the telescope to stop shaking after touching the camera.
  • Focus on the telescope was also big on my mind with colors turning green or blue (asymmetrically from the misalignment, of course), and tiny adjustments were next to impossible with the knob jumping.
  • Zoom in on the camera too far, and I get a lens error when it gets stuck (I used the 2x eyepiece for a chance at locating Jupiter with the 4x).
  • And even then I couldn’t get a still image where Jupiter resolved as a circle – looking directly: I saw a disk; camera preview: disk; take picture: flare.
  • I was also having to re-aim the telescope every two exposures to track Jupiter as it moved across the sky. After a couple pictures, I rotated the camera so manual tracking wasn’t on a diagonal relative to the screen.

Improvements

From here, I have a few ideas on how to improve my setup: I could further modify the bracket to make it easier to use by reducing the number of parts I need to keep track of simultaneously – possibly by designing and 3D printing a custom bracket. I do have ideas. Alternatively: I have completed my goal of planetary photography, so I might consider indulging in a sensor that connects directly to the telescope instead of an eyepiece. It would be a tough call between that and a tracking mount, but taking the setup to an area with less light pollution can only improve my results.

Takeaway

I am enjoying learning more about God’s Creation. Looking closely at my picture, I can see more points of light than the ones I know about. Are any of these smaller moons? I don’t know. Is that red star to the right actually a red dwarf, or is it a camera error? I don’t know. What are the limits of my optics? I still have much to learn about them, but the saying is that the more you look, the more you will see.

Final Question

Are you into astronomy? What advice would you give someone who’s just starting out?

I look forward to your answers the comments below or on my Socials!

Telescope for Christmas

Good Morning from my Robotics Lab! This is Shadow_8472 and today I am covering a new telescope I got for Christmas. Let’s get started!

I’ve wanted my own telescope since before I was old enough to responsibly take care of one. My childhood Monopoly set is a novelty Astronomy Edition. Solarquest was an even more dear game – though we’ve learned a bit more about our solar system since our copy was made.

Unboxing and Assembly

Unboxing was straightforward enough. I followed the assembly instructions, but had a little trouble extracting the tripod’s hex wrench out of its storage slot the first time. The kit reminded me of how a good camera may be bought in accessory parts as easily as a starter kit. Standardized interfaces on interchangeable parts make for an upgrade path.

The instructions cautioned against letting adults unfamiliar with with the telescope on top of the usual warning about children. To see why, I needed look no further than the fine adjustment tools. While intuition says to point them like a camera aiming stick, they’re actually designed to rotate.

The star scope was of interest to learn about. To use, aim the main telescope such that a little, red dot is over the object you wish to view. No matter the direction you look into it, it points at the same spot. The instructions said to aim the main telescope at a land-based location a distance away to calibrate it.

First Light

One “Sabbath afternoon” drive after unboxing the telescope, my father and I scouted a local lake after sundown for stargazing locations. The best spot we found is above a boat ramp, but it has a gate we found open. While a ranger may ask us to leave if we use that area, it’s not like we’d be doing anything more destructive than intended use. We [my mother and I] later called the visitors’ center during hours to confirm a good spot.

After the drive, the clouds broke at home enough to get some nice details of the moon. With the telescope’s magnification, the Earth’s rotation is apparent, but not impossible to manually track while taking turns looking. I tried holding up my tiny Nicon digital camera I’ve used in 3D printing, but was only able to get some blurry pictures before clouds dimmed the sky.

Accessorizing

Starting a new hobby involves cost. There exist a wide range of accessory lenses, filters, eyepieces, tracking systems, and more, but I don’t yet know how seriously I will take this telescope over the course of months to years. First off, I got a bag to take it in the car. Other than that, I at least want some good pictures of the moon and hopefully Saturn’s rings.

The included smartphone mount is nice, but I don’t have a functional smartphone at the moment. My PinePhone prototype unit might work, but the mount will mess with the power button when lining up the camera properly. Another idea is to rig something with a Raspberry Pi. They’re releasing a new generation after what feels like forever, but I’d need to be careful about exactly what case I pick. I’d want something to accommodate a nice touchscreen and a power bank.

Camera Bracket

My first thought was to get a second cell phone mount and pinch fit the tiny Nicon by the camera lens. The obvious concern here is when the battery runs dry and the lens retracts. I’ve abused a similar vintage camera when it was relatively new, and my guess is it would be fine. Nevertheless this idea evolved into cutting up a pool noodle just right to grip the telescope eyepiece and support the camera.

Guess what! Pool noodles are out of season at the moment. Early on we’d considered using the standardized photography mount somehow, but upon closer inspection, all we’d need is a corner bracket. We considered 3D printing, wood, and even bending a retired road sign we [legally] have as aluminum stock, but a near-perfect steel bracket turned up while chasing down compatible bolts and wing nuts. It just needed the holes enlarged a little.

The bracket ended up going together in a single night as my father and I refined a design that would be safest for both the camera and equipment.

We took the telescope out for a second night. I aimed it at what I thought was Saturn, but turned out to be Jupiter. It clearly picked up the four Galilean moons around it. A real time tracker online informed me that Saturn was below the horizon and that the moon was almost new at the time. I was unable to get the bracket to cooperate and a gentle wind occasionally made it difficult to keep the telescope still.

Takeaway

There is still much to do in getting started with my telescope. I plan on follow up posts in the coming months.

Final Question

Have you ever used any optics to observe the night sky?

I look forward to discussing your answers in the comments below or on my Socials!