My First (High Pressure) Pneumatic Artificial Muscle

Good Morning from my Robotics Lab! This is Shadow_8472 and today, I am assembling and testing my first prototype artificial muscle. Note that this is not a tutorial, but a work in progress; I’ll be making more elaborate updates when I finish each phase of prototyping. Let’s get started!

Initial Construction

In case you missed my last post on McKibben artificial muscles, I’m using some surgical tubing with a in a braided ASA plastic sleeve as the main body of my muscle. Starting out, I’m using a bicycle pump for my air supply and some old, mostly cotton string for holding the ends together. We cannibalized some old garden drip line for structure in the inflation end, and a screw on the other end.

Assembly started with cutting around 12 inches each of tubing and sleeve. The sleeve unravels like crazy when being stretched, so I melted one end with a candle lighter. The mouth was nice and tight, but it was stuck contracted. I fed tubing in the other end melted that end open. I inserted the two inch length of drip line and screw into their respective ends and tied them off.

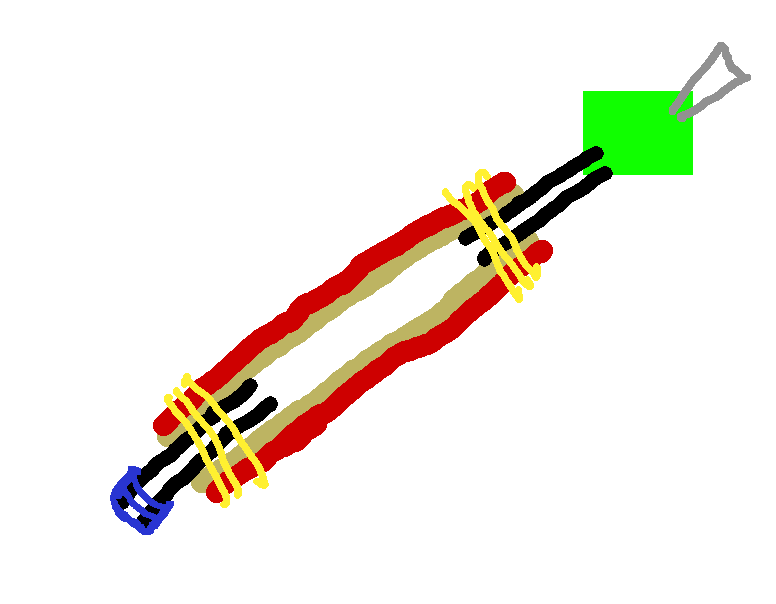
I drew this picture in GIMP for my father’s benefit before construction, but it highlights a “green part” between the actual muscle and the bicycle pump (gray triangle). Note this was drawn before I added the screw on the solid end and the blue parts are painter’s tape that lasted about as long as it took to try taping the muscle to a ball inflation tip for the pump.

First Actuations

There was no way my chosen string was holding at pressures required to inflate the muscle, so we moved to zip ties. We also redesigned the adapter to use rubber tubing wrapped in duct tape to resist inflation. It happened anyway when the rubber expanded lengthwise as well as radially. After extending the tape just a little farther, I started pumping as the hiss of gas escaping the system made it difficult to focus on the pump’s pressure gauge.

We ran a number of tests, and over about 10 inches of workable muscle, the whole thing contracted to about 8.5 inches and expanded from 3/8 inch to 1/2 inch diameter – about as thick as the casing would go according to tests later on.

Development continued after the pictured state. We had some irreconcilable leaks with the zip ties and switched to more expensive pipe clamps while we dreamed of ordering some rubber tubing with a thinner wall. The Green Part was replaced again with more plastic tubing probably intended for water, and accordingly leaky at its adapter. Only the very tip is still rubber tubing, and that’s only to create a seal someone has to hold closed while the system is under pressure.

Speaking of pressure, every improvement raised the maximum possible pressure before something failed or was otherwise too loud to tolerate. We made several milestones, but eventually maxed out the pump at 150 PSI, though after I sealed the leaky connector with some proper sealant tape, air stopped escaping until 80 PSI, but when it started, it was painfully high in pitch.

Takeaway

My finger pads HURT after assembling that thing. It could be working with the braided plastic or messing with the pipe clamps, but I don’t see many of my materials being final picks. The contraction ratio is lacking, the tube is high pressure, and if I’m going to be using a lower pressure anyway, I might as well go back to zip ties.

Final Question

During testing, I kept going to higher pressures because I was operating under the hypothesis that there was more contraction to be had. The calipers said otherwise; manually squishing the casing off the spool it came on gave about the same diameter. I identified my false impression as coming from the fact that the woven casing came flattened out, and my mind wasn’t translating diameter and half circumference properly. What hypotheses have you discarded while working with something?

Beowulf Cluster: Part 1: Sum of Its Parts

Good Morning from my Robotics Lab! This is Shadow_8472 and today, I am planning a model supercomputer. Let’s get started!

I feel swamped with projects right now. They end up stacking up and with different priorities, so I’m glad I can finally do something with this lockdown care package I recieved from Third Workshop several weeks ago.

The package contained five Minus Forum Fanless Mini PC’s, model N40. After carefully removing and discarding the wrapper, I pulled one out and hooked it up. It booted to Windows 10 setup. Nice that they included something, but for a number of reasons, I will be installing some version of Linux on these tiny machines. What annoyed me was that the screen where Windows wants me to accept the EULA did not have a reject button.

What annoyed me more was how I never received an answer from support about a partial refund per the Windows EULA. Honestly, I did that more on principle, and I don’t know how it would work. I am not the original purchaser, and they were already on sale. Token effort. Their support website didn’t have a security certificate for protecting login details, so I didn’t prioritize pursuing a couple dollars per machine any further. In the meantime, I turned my attention to booting Linux from my Debian install stick. Let me tell you: the BIOS on these things is about as user friendly as their tech support.

By default, it priorities internal boot devices over removal media, and it only gives a tiny window of opportunity to enter the boot menu, or it’s off to Win10. it’s almost like the original manufacturer didn’t want people looking at the BIOS at it’s almost like the original manufacturer didn’t want people looking at the BIOS at; I had to look up what key to press, and it was either F2 or DELETE, and when I got to the BIOS menu, it was the ugliest one I’ve ever seen. The aesthetics were on the low end for terminal style menus, but the real kicker was how they handled moving the boot order around. I wasn’t able to figure it out except that it felt like swapping items in an array instead of moving things up and down a list. Despite the challenges, I was able to boot the way I wanted to.

Assembling a supercomputer though, that is a whole other story. There are two kinds of supercomputers: distributed, like what Fold@Home is using to combat the CCP Virus Pandemic (which I intend to add these goodies to), and clusters, like what I’m trying to build. At present, I am pursuing the term Beowulf Cluster in my searches.

I just wanted to touch on another reason not to go with Windows for this project, besides me transitioning to Linux whenever possible. Windows charges per instance of their OS. Supercomputers need one OS per node, and practical supercomputers will often have at least five or six nodes working in parallel. Couple that with the already sparse number of applications for supercomputers, and you end up with virtually no supporting software to use Windows for a Cluster computer.

The biggest challenge I faced in this part of the work was knowing what to order. I had to ask someone on my family’s Minecraft server before I knew for sure that a switch would serve just fine. Then came the rest of the support system.

These little computers support Gigabit Ethernet, so that’s what I’m aiming for all along the system, primarily the network cabling. There’s a lot to know about wiring. Modern data transmission builds on the twisted pair technique originally invented by Alaxander Gram Bell. Since then, we’ve found ways to reduce noise, such as insulating the wires from each other, shielding them from each other with foil, shielding the whole set of wires from their environment with more foil, and so on and so forth. There are specs on fire safety if the cable is installed horizontally, vertically, or even in the ventilation system.

More relevant to my project is how the cable’s wires are made. One kind is made with lots of strands, making it easy to bend around and is often used between computers and the wall. The one I want uses solid wires; the wires won’t be moving around much after installation.

Rounding the computation side of things off, I have a Raspberry Pi 4B on order. That was a small adventure. Turns out the B in Pi XB just means it has an Ethernet port, and a model A doesn’t have it. Since they aren’t making Pi 4’s without Ethernet at present, all cases made for plain “Pi 4” should work for my purposes. I went for one that doubles as a large heat sink. Neither have arrives as of writing.

The final hardware challenge is power. While I’d like to just slap a strong enough power supply on the mounting board, different parts of my system will be running three unique voltages. The only ones I’d have any chance of combining are the original minicomputers, and their power supplies are matched pretty well with what they need. They also take up too much real estate on the power strip. I researched over and out of my price range, landing on the conclusion that more research would be needed to combine transformers. The plan now is to grab a couple angled three-way splitters and use the original transformers.

I haven’t even gotten to assembling the system, and it’s already a formidable challenge. Nevertheless, there is one more good reason for combining all these machines in one “casing:” I believe my family is near capacity with the number of computers our router can physically address at once, and that this project would otherwise put it over. The way it’s planned out, as the controller. the Pi 4 will be the only node to talk to the outside.

Final Question: What would you use a supercomputer for?

Family Photo Chest Part 1: Project Outline

Good Morning from my Robotics Lab! This is Shadow_8472, and today, I am beginning a new project I hopefully won’t burn out on. Let’s get started!

Twenty years ago, my father was tasked with scanning and distributing the contents of an old sea chest that used to belong to his father. Fast forward to the present day, and the project hasn’t even started. I’ve been building my skills the last couple years, and I think I can do one or two better than was originally planned.

Timeline: I’m burned out after three intense weeks on my last project. I’m two weeks ahead, and I plan on keeping that lead for now. After two weeks of this project, I want to go back and try getting the official Java on Micro Core. With any luck, this post will come out when that’s already happened.

I’ve been planning this project for a while now. Nothing to make a whole post about, but important nonetheless.

My intended finished product is as follows: Family members will be able to go to an IP address in a browser, search by a system of tags, and navigate to a specific scan’s page. Groups of pages will make scans of books easier to find, and comments on each picture will only make identifying people in each picture easier.

During my initial investigations, an acquaintance recommended Philomena, a Booru-style image board that fits the description almost perfectly. Their code is free and open source, and the license is compatible with what I want to do.

On the hardware side of things, I have a few prototypes milestones planned out.

The first milestone will be declared when I can manually upload an image and view it on the site from a separate connection. I am planning on prototyping on Blinkie, though almost any computer should do.

The second hardware milestone will be when I have the pictures stored on a RAID array for redundancy. During a visit to Third Workshop, I heard that these can be tricky to do myself, and there are cheap, reliable, preassembled units I can use.

The third hardware milestone will move the software off Blinkie and onto a new machine I want to build myself. I want to remove the innards of whatever RAID setup I end up getting and arrange them into a custom case with a different Raspberry Pi serving as the motherboard.

The main event of the project is actually scanning pictures for safe storage. I know for a fact that disorganized files are discouraging to sift through, so I want to write a script to handle scanning and uploading files. It will have functionality to define groups of pictures as they are scanned, as well as handle bulk tagging.

Skills I expect to learn in the near future: composite 3D printing with ABS, a new programming language, and a better understanding of Git and any other software I need to get Philomena running effectively. As of writing, I have already started work on next week’s post, so I may be cheating a little on that last detail.

Final Question: Do you have any decades old projects that just never seem to get any attention?

New Priority: Minecraft Server

Good Morning from my Robotics Lab! This is Shadow_8472, and today, I’m setting up another Minecraft server, but this time, I’m setting goals a bit higher than usual. Let’s get started!

I am after an automated, headless, dedicated Minecraft server. That means I want a machine that only runs Minecraft, and nothing else. The machine itself will live in a network closet or somewhere where it can have a power cord and Ethernet while I use SSH to get in to change things. I don’t want to have to babysit it, so I want to write a script or two to manage the whole server. The whole idea is to get the maximum amount of performance for Minecraft while spending as little as possible on the OS and other supporting software.

The main bottleneck is RAM. I have 8 GB to work with for now, and that’s fine for running a survival world and a creative world at the same time in Ubuntu, plus a couple tabs in a browser. Both this machine and Derpy have historically been used to host Minecraft servers, but I want to consolidate any running servers into a single machine. To that end, I’d like to see if I can comfortably run three or four servers at once.

Distribution choice is a little more important now. I’m after something as light weight as possible. Unlike the past several months, I’m actually doing progress reports as I go, so I don’t actually know what I’ll have when I’m done. I’m seriously looking at about six distros ranging from Ubuntu Server to Lubuntu to Puppy Linux.

A family Minecraft friend who will likely be playing on the server brought up Linux From Scratch. It’s a resource for compiling your very own distro. It looks fun; it looks educational. I looked up a couple video reviews of it and decided it looks one or two years down the line for me. My goal is two weeks here, and hardware challenges are starting to make me think I may already need to double that.

It turns out there are a bunch of tools for people who want a little more involvement with what’s in their operating system without wanting to go into source code level of detail. All the ones I looked at either have their domains up for grabs or are otherwise obsolete.

There was one more distro this friend brought up: Tiny Core Linux. It aims to provide you with only what you need to get started with a wide variety of projects. To paraphrase their stated goal: add what you need, not demolish what you didn’t ask for. After poking around a bit more, I found another version on their site that nixes the GUI. It’s not like I even wanted one for this project anyway. Micro Core it is until further notice.

I remembered how Derpy used to have this SSD it supposedly used to improve make things go faster. It’s not like it was being used, so I thought maybe I could use it as part of my little project. So I opened Derpy up and pulled it out.

Different computers with open architecture have different schemes of making sure everything stays where it’s supposed to. When I installed Derpy’s present SSD, I didn’t have the correct part to mount it on, so I just put it on what I had and let it be. With the HDD to SSD bracket being freed up, I went ahead and swapped things around. It just took a while to figure out how to get the bracket off.

With the brackets finally swapped, I moved Derpy’s old 60 GB drive to my project computer case and connected it with a SATA cable I had laying around. I think it may even be the one it originally came with. Power was similarly available within the case, but I had to remount the SSD to another position within its bracket so it could reach.

Trying to mount Derpy’s SSD with Puppy Linux

Backing up a little, before I started seriously considering Micro Core, I burned a Puppy Linux live CD. Puppy Linux is another one of those small distros that comfortably loads into RAM.

It’s funny how the sound of a CD drive made me smile. It used to be the sound occupying the boring period between when I started computer time, and when I started actually playing.

I rejected Puppy Linux after I saw office software as well as other stuff I didn’t need included, like a whole GUI environment. Nevertheless, I still used it to verify that I had everything hooked up correctly. It took a while, but I happened across a utility within Puppy that left no doubt. I spent a while trying to see if there’s anything on the drive before I eventually asked my father and he went ahead and told me to just format it.

I know I said I was going to do a more update-style post, but this is running into a longer entry, so I want to split this one. It provides a natural-ish breaking point about here. While I thought I was going to need about two weeks, as of this writing, I’m thinking either three or four weeks total work may be in order. If I break things up like this, I may end up with even more parts. That, or I just spend some of those weeks not doing much but learning what to do next.

Final Question: Have you ever messed around with otherwise junk to turn it into treasure?

Infrastructure Update

Good Morning from my Robotics Lab! This is Shadow_8472, and today, I am going over a few changes to my immediate setup. Let’s get Started!

I’m afraid I have some sad news to start with. I’ve been shuttling BlinkiePie around in my backpack, and it’s finally caught up with me. Some time, some how, I wasn’t careful enough, and the case broke. Some time in the near future, it will likely be getting a dose of super glue, but I’m afraid the base will need to be reprinted. If it does, I will be modifying the case so the screw holes actually line up. If I’m feeling especially adventurous, I may even make it accept multiple models of Pi’s.

I otherwise had a few adventures this week. Neighbors were having work done on their house, and I needed to go out and about. I took Blinkie with me, and tethered it to my phone, as well as my laptop. PuTTY wasn’t fully happy. I spent a long time chasing down the supposedly different server key fingerprint, but I didn’t actually find for 100% sure. Since this is a security issue, I’m not going to share my best guess I’m about 90% sure on.

On Friday, I was expecting to spend a couple hours working on my project while my mother was working at the church, but my laptop politely asked to update like I told it to. I didn’t pay close enough attention, and I found myself stuck there for four hours so I could press F1 about three times during the massive update. I’m thankful I stayed, otherwise I was within a minute of having to leave it over Sabbath, and there are always a lot of people in the church office on Saturday morning.

I won’t say I like the update, but I won’t say it isn’t all bad. On the plus side, Windows now has a system-wide dark mode, a feature I personally find appealing. On the minus side, my laptop’s fairly old, and each new line of code it must run to keep up is that many operations not servicing the programs I want to run.

Speaking of programs to run, I went into the workshop and set up for working on Blinkie over SSH and the command line, but I was advised to install an IDE (Integrated Development Environment). I was even there an hour, and Headcrash, the guy running the place, replicated my present progress while we were talking. He talked me into installing PyCharm.

I came up with the comparison that the difference between IDE’s and command line work is the difference between a graphing calculator and a pencil. The pencil is simple, easy to pick up, and important to understand how to operate before using an IDE. IDE’s on the other hand, take care of a lot of things for you. It blasts you with so much information you don’t know what to look at at first. And the scariest part is setting the thing up. There’s a lot of help out there for my “pencil,” but there’s a lot more to break with an IDE. It felt like I was slipping into a commercial airliner cockpit with only a driver’s license. I’m just glad I had someone there to figure out what was happening when something misaligned.

This week felt like a lot of learning curve walls.

Final Questions: Have you ever used a graphing calculator (outside school)? Do you have any other suggestions for comparison?

Programming a Pi to Deter Cats: Part 4

Good Morning from my Robotics Lab! This is Shadow_8472, and today, I have a small, but important step completed. Let’s get started!

The tutorial I’ve been following gave me a hiccup after compilation. I had a passing difficulty when the commands I was copying used A different version number for an ls command.

Other than that, I had a little drama copying some expected output as a command, and when I did get the correct version number and file name in the command, there were a mismatch witha number or two. I figured it was just because of the version.

In the end, the tutorial had me test everything by running Python in the virtual environment, import OpenCV, and have it report its version. I was so relieved when it gave something back that didn’t resemble an error.

Going forward, I think the next, big milestone needs to be turning on an external light when it sees my cat in the frame. Setting this goal opens up a slew of smaller goals: connecting an LED to the external pins; learning and implementing basic elements in the OpenCV API; setting up such a program to run from either a single command, an icon, or bootup.

After that, it I should probably set it up as a VNC server and place it in its rightful position where it can start learning the difference between naughty cat on the counter and hungry human in the kitchen.

This project feels like it’s gone on ar least ten times longer than I expected. It’s good to have a small victory for once.

Final question: How do you keep track of progress in long projects?

Programming a Pi to Deter Cats: Part 1

Good Morning from my Robotics Lab! This is Shadow_8472, and today, and likely for the next couple weeks, I am studying up on how computer vision software works so I can get started on the software to convey a message to my feline friend about venturing in places he isn’t welcome. Let’s get Started!

I decided a long time ago that I wanted to explore the free and open source option OpenCV for this project. From what I can tell, I will need to play around with OpenCV on my desktop first to get a feel of how to use it.

As of the time of writing, I believe my workflow will start with getting OpenCV onto a Linux desktop. After I’m comfortable with how it works, I can try running it on the Pi. Depending on how well the Pi takes it, I will develop the actual program on either my PacMan Ghost case, Blinkie Pie, or my Ubuntu server tower, Derpy Chips. A period of testing will involve Blinkie watching the forbidden area and logging suspicious activity: basically anything that moves, and narrow that down to naughty cat behavior. While that’s happening, I need to develop an audio turret.

My mother actually found a dog training device that emits high frequencies, and the cats aren’t too fond of it either. I’ve already tried taking it apart, and it’s so cheap, getting into the case for tinkering will mean a new case. My goal for this phase is to get the Blinkie to turn the nasty sounds on from a remote desktop.

Once I have my cat identification program working reliably, I can connect it to the frequency generator and set it loose. For the first few days and weeks, I’ll want to monitor it and evaluate its results by looking at pictures from suspect incidents. I’m looking forward to obedient cats.

Final Question: Have you worked with Neural Nets on Computer Vision problems before?

Planning a Semi-Sealed Night Light Part 1

Good Morning from my Robotics Lab! This is Shadow_8472, and today, I’m starting a new project where I install some electronics while a project is still printing. Let’s get started!

This will be a much larger print than I’ve ever done before. I know that already. I’ll be laying out the pieces of the project and ordering them as I write, just to play with the writing style.

Different parts include: Blender modeling, Laptop repair, White filament, and Assembling a circuit. If I think of more, I’ll insert them where appropriate.

Project Concept: the final product will be a gift for a friend I’ve known for a long time. It will be roughly cube shaped light printed from white PLA with relief pictures of either Angels or Cats on the sides. For extra style and practicality, I want the top sculpted to look sort of like a curved roof. A long lasting light bulb will illuminate the whole thing from the inside from atop a custom circuit board, but anything inside won’t be accessible after the print is finished.

Laptop Repair: the other week, my laptop refused to accept my power chord. It looked like a bent power pin, but it was a large piece of plastic from the port missing. That will easily take up a post when the part comes in and I cover its repair.

White Filament: I have two colors of plastic right now, black and red, neither of which would look good for a light. The plastic needs to let light through, but also go with pretty much anything.

Assembling a Circuit: this is a topic that could easily take two or three weeks and will challenge and grow my abilities the most. Simply put, I have no idea what I’m doing here, except that I need it to move power from the power chord to the light bulb, and maybe some colored LED’s around the outside. I’ll want to thoroughly test it before final installation.

Blender Modeling: this one will happen in tandem with the previous one. I’ll need to establish a maximum size for the circuit board based on how big I can make the case with the printer. But I’ll need the final measurements of the final board before I start the final print. Unless I want to toy around with an induction based power chord, I’ll need a place to plug in a power chord. It might also help if I was able to screw down the board itself.

So far, I have a fairly good idea for the overall shape modeled in Blender; I don’t think I have a good mesh yet, the boolean operator didn’t exactly like two half-cylinders intersecting like I had them doing.

Final Question: How have you aimed for something out of reach, but not so far as to (hopefully) be unobtainable?

Stress Testing PLA as a Raspberry Pi Case Material

Good Morning from my Robotics Lab! This is Shadow_8472, and today, I am running a looping Hello World program on my Raspberry Pi for a while to see if my work for the last few weeks needs to be redone in ABS plastic. Let’s get Started!

I’m going with the hypothesis that while the Pi may run a bit warm for PLA plastic, with the heat syncs, and ventilation, I should be okay.

My procedure will involve using an infrared temperature sensor I borrowed from the workshop I joined a couple months ago. After messing with it for a while, I figured out how to use the temperature probe that came with it. I’ve taped the probe in the space I’m most concerned about overheating as I don’t have a line of sight view of the place.

Each data point I take will track the ambient temperature of a consistent point nearby, the temperature of the probe, the CPU speed, and some points will take the temperature of a chip on the inverted Pi’s exposed underside, but only when data points are coming in after 5 minutes or more.

***

I’ve started collecting data. The probe wire is notoriously difficult to keep in place. I took data points while it was off and freshly booted. Nothing much changed temperature wise except the chip getting a little warmer. I’ll include a screenshot of my results later.

***

It’s part way through data collection. I may have skewed the results of collecting the data on the chip on the top side by measuring at a different angle. Ambient temperatures are fairly steady but the probe location below the heat syncs is slowly climbing. I just took another measurement, and the possibly skewed one doesn’t seem like I’ll need to throw it out after all. I was hoping it was my readings and not a temperature spike. I’m also concerned that the probe may be slipping, especially if it’s getting closer to the heatsink.

***

The probe was slipping! Its readout was growing steadily as the tape holding it in place gave way. My data at T=40 minutes and on will have it correctly positioned.

***

***

Estimates of the low end for PLA softening are around 60 degrees C or 140 F. In conclusion: While I believe my data has a large margin of error, I do not believe it is so great as to void my conclusion that it is safe for my case to operate my Pi under these conditions.

The Pi only ever reached 33% CPU usage, I believe it was throttled by the task of writing to a command line. If it were to run hotter, the plastic might still be in danger. I will need to redo this test when I’m running image analysis on it.

Final Question: How else can I improve my tests?


A New Tool Part 13

Good Morning from my Robotics Lab! This is Shadow_8472, and today, I’ve finally completed the construction of my New Tool!

I believe it’s only appropriate that I write this post on the computer in question, a little Pac-Man themed Raspberry Pi system I’ve named Blinky Pie.

The work this week was actually fairly simple. I stopped by a local hardware store with the Pi and the case to pick up two screws, and the guy who helped me was very knowledgeable. He helped me choose screws that were big enough to hold the board, but not so big as to crack the printed plastic.

Before I did my final assembly, I did a dry run where I taped the camera in place across the top of the dome and down the other side, and it worked pretty well, so well, I only had to add a final piece to keep the camera secured.

I took the camera out to finally install the two heat sinks that came with my Raspberry Pi starter kit, a task my father was happy to help with. After that, I installed its ribbon cable around the back of the board where I could install it with the screws I picked up earlier after making sure the camera was installed correctly. Of note, I have been having a lower rate of failure when installing that thing lately.

While celebrating the final completion of the base hardware for my tool, I ended up exploring some settings on the GUI, specifically the task bar, or as Windows would call it, the Start bar. I found a setting to customise the color, and about a setting for about everything you could think of and double it. The term is called “decision fatigue.” There are so many settings, you can spend, and have to spend an hour or two to get everything looking OCD compliant. One glitch preventing using the “icons only” setting from save space has a workaround of moving the task bar to a side and back again, but that throws a bunch of other settings into chaos, mainly the height of the task bar, and guess who doesn’t have a “restore to defaults” button!

I’ve run multiple tests with the Pi idling in the case before its final installation. I’m pretty confident the case won’t melt. It’s well ventilated by the heat-sinkable chips. I even ran the dry assembly for a few hours, and the plastic around the stock board with out heat sinks was only warm.

Final Question: Besides feline repellent, what other applications can you think of for a Raspberry Pi with a camera?