PC Upgrade Time

Video Link

Good Morning from my robotics lab. This is Shadow_8472, and today, I’m covering the installation of my new SSD (Solid State Drive). Let’s get started.

If you are watching the video version, you can see a time lapse of the upgrade in the background.

So, for the upgrade, I’m adding a 250 GB drive. To mount it, I have a plastic bracket and a SATA cable. After bringing the computer over, I fetch a bowl for holding screws. I unpackage my supplies and open up the case. I use a little canned air to clear some of the dust buildup. It takes me a moment to puzzle out the final orientation for the bracket, but when I get it, I start installing the SSD with the big screws from the bracket set. The drive does not accept them. I use the smaller ones instead.

I feed the SATA cable through the case and attach it to the motherboard. After taking the faceplate off to get a better look the first drive’s mounting, I remember the quick release system.  I start attaching the remaining screws so I can slide the assembly into place. At least, that was the plan. The screws refuse to go in straight. There are three sets of holes to mount the bracket and all are too small for the bigger screws.

I spend a while battling the holes and drop the first screw in the case. I fish it out the first time, but the second time, I have to pick up the case and dump it. After trying one last time, I abandon the venture and locate a smaller set of tools.

Fortunately, I find some acceptable screws in the small screwdrivers’ case. One catch: of the six screws I find with the small screwdriver set, only three fit. I try out a few other possible screws from the garage, but none of them fit. I stop the camera for a few hours and go shopping for a fourth screw, but I don’t find any.

While I shop, I open myself to the possibility of mounting with only three screws. After all, three is all you need to hold it still if you aren’t planning on shaking the thing around on a regular basis. But as a last ditch effort, my father comes in and lets me modify a long screw that would otherwise have fit. I try marking the length, lopping it, and filing it down. The shortened screw’s new tip is too big. Resigning to my three screw plan, I stick the assembly in and close everything up.

After reconnecting my peripherals, I turn the system on and have a circus of a time trying to figure out if the operation was a success or not. Windows didn’t see the new drive, and I even reopened the case and adjusted the connections. Eventually, my father was indeed able to confirm that the system did see the drive, but Windows wasn’t acknowledging it for lack of  formatting. I opted to leave it unformatted until next week when I do my research on installing Linux.

In closing: This was the first computer upgrade by myself for the most part. I was clumsy with my organization despite my attempts to make everything go smoothly, but it was a success anyway.

Final Question: What was the first computer upgrade you did without supervision?


First Project Complete

Good Morning from my robotics lab. This is Shadow_8472 and today, I am explaining why I am not upgrading my computer this week. Let’s get started.

Long story short, California was set ablaze last week.  Our neighborhood saw a glow from the fire burning the next city over. We packed all our most important possessions, like a 100+ year old trunk of photos and my desktop computer.

The Internet dropped out for a day or two and our gas got nixed so it wouldn’t make a flamethrower if the neighborhood burned down. We still had power, and our stove and new drier are electric, so we only really missed our hot water. We tuned in to the local radio station for live coverage.

The station itself was in a badly burned section of town, almost having been burned down themselves. They were ultimately spared, but they did say something about an exploding tree shooting an ember the size of a large fist into their back parking lot.

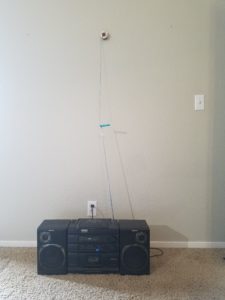
The stereo we were listening on is almost as old as audio CDs. Fun fact about radio technology: when you are barely getting a station, it gets fuzzy with static. Repositioning the antenna is a minor mitigation, but it doesn’t help when your position in the room can interfere with incoming radio waves, even if you are just sitting up.

I eventually got tired of the static and tried to fix it. The sliders on the front helped, but not enough. Touching the antenna seemed stabilized the signal almost perfectly, but no one seemed interested in standing there with an arm on the thing.
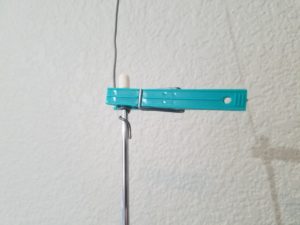
Eventuality, in true MacGyver style, I raided the tool chest and grabbed the first metalic spool of wire I saw, in this case, some sodder for stained glass.

I ended up using a plastic clothes pin to affix the makeshift antenna extension. I later improved my design by curling the sodder around the tip of the antenna to prevent the connection from slipping down. Since then, the radio only complained when adjusting the spool, which was hung up on the wall.

In closing, the fires are still burning, but the firefighters are getting them under control; it looks like my neighborhood was spared. I haven’t seen any national coverage, but locally, the news has been positive in the face of the disaster. Sure there were some looters going through evacuation zones, and people are still trying not to breathe the airborne remnants of other’s houses, but the impression I got is that people as a whole are getting together to help each other.

In the future, I am sure there will be times I am at a lack of overall progress due to one delay or another. What do you think about unplanned mini-side projects?

Early Progress

Good Morning from my robotics lab! This is Shadow_8472, and today, I’m going over my progress so far. Let’s get started.

Now that I’ve written about getting the site up and a few vague goals, I want to explore some relevant research I did before I went off to start blogging about said research.

ROS. That is about the first, term you should hear when first looking into hobby level robotics. ROS (Robot Operating System) is, surprisingly, not quite a OS (Operating System) for robots. My understanding is that it’s more like a program that manages robot parts. It’s free, open source, and used at all levels of robotics, including some commercial products. Just don’t use it for something that absolutely must not get hacked or someone could die. Security, I hear, was more of an after thought.

Linux is the more familiar name for the do-it-yourself type of computer OS. Personally, I’ve used Windows since I first taught myself Chess on Windows95. Guess which OS ROS runs on. Answer: Linux. Guess what my second major goal for this project is going to be. (Tip: the first goal was my first post.) Answer: Install Linux and learn more about it. Now, I’ve had some minimal exposure to Linux at both my high school and university (both used Windows primarily). I’m not a “What’s Linux?” type of guy, but I’m no alien to it either.

Gazebo is another program I read about related to ROS. It’s some sort of robot simulator. I don’t know much about it, except It primarily runs on Linux, and that you better know what you are doing if you dare set it up on any other OS *Windows*. I think it prefers to run in Ubuntu, but I’ll check that out later.

Anyway, since Linux keeps popping up everywhere I look during my preliminary investigations, I figured I’m not going to have a good time if I try to get anywhere without it. I set out to install Linux on my desktop; my SSD was full, even after relocating a sizable file and picture archive. Somewhere on Gazebo’s site, they recommended against just running Linux off a flash drive, which would have been my next investigated solution. I finally caved and bought a new SSD to install so I can dual boot my machine. It was about that time I decided to start this little blog sidequest. Besides, the more I learn, the more ambition this project goal seems, and I can use all the help I can get.

That pretty much brings you up to date with my research so far. As of this posting, I have not installed the drive. That’s in next week’s topic. I plan on uploading a video where I perform the upgrade.

Final question: While my ultimate goal is to assemble the software side of things for free, paid stuff still might be beneficial to look at. (Think, “They did it, now can I?”) What software should I look into?

Project Goals and Dreams

Good Morning from my robotics lab! This is Shadow_8472, and today, I’m going over my long term goals for this blog. Let’s get started.

Starting off with my core goal: I want to build a social robot with a customizable personality using open source hardware and software. My hope is that anyone reading can follow along with their own robots, learning from my research and hopefully contribute back as the projects develops.

Social robotics is a field within robotics where robots are made to interact with people. I expect building the robot will be the easy part. Programming it will be the real challenge. As far as the physical robot itself, I have been considering using Proto2, a platform developed by the team at sweetiebot.net. According to their FAQ page, they intend to release Proto2 to be open source before the end of the year.

In addition to making the personality customizable, I would just love it if the software was capable of operating offline. From my research so far, my first impression is that this is a stretch goal; any potential personality software I found requires an Internet connection at all times. This may be because it is just easier to program, or if it is even reasonable with today’s technology.

This leads into my first dream level goal. Maybe, just maybe, some of the work done here will end up in a larger robot serving as someone’s service dog. I doubt a bot on that scale would be cheap without having a major reduction in price. I hear nylon muscles are under development. I may have to check back on those in a few years.

In closing, my strategy is to aim high and hope I can find the right people to work with along the way. For my ending question: What personality traits would you give a robot?

Hello World!

My site is now active. As I enter these first few words, I’d like my audience to know, setting up a blog is not easy. Sure, I could have gone an easier path, but for me, this isn’t just a robotics blog. I have a class in web languages that I will need to retake some time, and I wanted to view my site’s code and edit it.

I started with the idea about a month ago. I made my first, permanent progress almost to the hour and minute. All along, I was figuring I’d be posting by “next week,” until I completed the task at hand and the next part of the problem presented itself. Even now, I still have a lot to do in terms of web design.

Never underestimate the value of a good tech support team. I rejected at least a few services with live chat who barely passed the Turing Test solely by running out of prewritten messages and displaying a lack of English skills. One place even had a chime announcing an answer to your question. The previous two features combined provide an experience I would imagine a low end fortune machine would provide. While the same chat client with an annoying chime was used for HostGator, my host, the help was consistently productive and the chime was something to look forward to. The tech support for NameSilo, my DNS, was awesome and helped me learn the difference between a nameserver and DNS records. NEVER underestimate the value of a good tech support team.

I intend to make weekly text posts, and hope to make monthly video posts. Each week, I want to end with a question. As the site is still under construction and I don’t know how to set up a comments section yet, I ask anyone who is viewing this: What is the date you first came across this site?

Edit: Comments are open now.