The Prototyping Process

Good Morning from my Robotics Lab! This is Shadow_8472, and today, I’m going over a short, but important side project I did this week. Let’s get started.

So, a few weeks ago, my mother made a request for a simple shirt clip. Using my skills I revived last week, I was able to get a satisfactory one in three prototypes. While learning the modeling software is an important step for me, I do not plan on providing a tutorial myself. When I go back and watch a tutorial, I will give the first lesson a link. What I do want to do is give tips on what I learn on my own.

The basic concept is a circle with a crossbar. I used a torus and a cylinder to model it in Blender. I didn’t have to go searching for the command to combine meshes, I just had to select both before exporting to a .stl file.

When it came time to print, the raft was a circle, probably because only the torus was digitally touching the print bed. My first and second prototypes were made from the same, tiny model; Cura saw Blender’s unitless distance in the .stl file as millimeters when I wanted inches. I learned to reliably scale models to a predictable size. When the second prototype came off the bed (the putty knife had a hard time with the uniform curve of the raft) there was this ridge that touched down to the bed. A few rough spots made it unsuitable for use on a shirt without first sanding it.

The third and current prototype had a model where the cylinder shared a radius with the height of the torus. This created a circle-slash raft, and it didn’t have so many problems with sharp artifacts from its manufacture. I wonder if the second prototype’s ridge on the bottom was an automatic support structure. I’ll need to print something that needs one to find out.

***

I have good news and bad news for myself. The good is that I figured out what the extra ridge on the second prototype was. The bad news is that it was a failed part of the print and not a support structure. I programmed up what looked like a lopsided sphere on a stick and told Cura to print it with and without a support structure. The only difference was that I got a raft with the shadow of the print instead of the contact point of it.

Final Question: I have heard about support structures sometimes being printed out of a different material. Are they ever printed like a raft you can peel off and sand down when needed?

From Blender to the Real World

Good Morning from my Robotics Lab! This is Shadow_8472, and today, I am learning to print a model from Blender. If all goes well, this should be a short post, but even if it isn’t, I should have my suspicions confirmed or refuted about the Z-axis progression. Let’s get started.

OK, so I did play around with Blender a few years ago. This time, I just want to make something simple as a proof of concept. A pyramid. I can set up my phone to take a picture every minute while I’m printing and then graph the progress with respect to time.

I won’t cover the setup and learning curve of Blender; there are a lot of tutorials out there. Just do not try to learn it by trial and error. You’re likely to get washed away with all the buttons and menus. My understanding is that it is NOT beginning user friendly, but at the same time, I understand it is basically the definitive free, open source 3D modeling software. Once you learn the core skills, you can move onto many other fields; like animation, still renders, game graphics, and (in this case) 3D printing.

I’ve had a desire to learn it for games, but I am still to develop my sills there.

***

The 3D printer is once again printing. The filament was a bit more painful to load than I remember. Good thing I didn’t unload it between each one. Anyway, I managed to use an old install of Blender to program up a pyramid to print. I actually took a cube and squished the top face down as far as it could go without actually making it an actual 5 pointed model. It’s close enough to what I need. I had to export it to a .stl file, not save, it.

This is my first print in the new case. Leveling the table was a little tight, but if it keeps the cat out, I can live with it. Anyway, there was a little bit of plastic messing with my leveling procedures. I need to get in the habit of cleaning the extruder tip while it is still warm. I suppose it shouldn’t matter too much. That’s what I think the raft is for, to get the print to a predictable place.

I chose to make a pyramid so I could graph the percent completion with respect to time. That was the hardest part of this week’s project. While I could have just sat there for two hours and recorded the percent every ten minutes, I went ahead and searched for an app to take a picture every one minute.

When I looked for such an app, I was assaulted by apps that offer to take time lapse videos of one sort or another, all these fancy fancy features and social connectivity… NO! I just want something to click the button every 60 sec. and make a separate file I can scroll through, and graph the results.

But I would say the hardest thing was setting up for the recording. I had to charge my phone, and rig a mount for it. Here’s the app I ended up using [Link], Timer Camera by Three Starfish.

My father actually did the bulk of the hardware arrangement. Nothing too fancy; the camcorder and tripod I used on the video posts usually lives at my church where we use it to stream our services on Saturday mornings. We didn’t bring it home this week, and I don’t intend to post these pictures anyway. Simple data collection.

***

I graphed the data. For every photo, I took  It’s almost linear, but there’s an inflection point where it speeds up rapidly after about 40 minutes. If this were simply a transition from raft and base layer to infill layers, that would explain things if it were z axis progression, but the second, faster part seems like it wants to be linear, but I’d need more data points for that. All I can do at this point is rule out percent time taken. I’d need a bigger/higher quality pyramid and a proper video of the progress bar.

Long story short: I took measurements of percent completion (almost) every minute. Now I want the min./sec. each percent is accomplished. It would be interesting to graph other shapes.

Final Question: I’ve eliminated time completed as the possible basis for percent completed. Maybe if I print up two more pyramids side by side (one after the other) that would give me more information. Anyway, What kind of shape would produce a graph that would look different if its completion was in plastic laid or z axis?

Ready for more

Good Morning from my Robotics Lab! This is Shadow_8472, and today, I am sidequesting into the world of drones for my first actual bot. Let’s get started!

I was seriously considering going for the PIXXY platform for what seemed like the longest time. Right now, I don’t know where I stand on what to build. I just want to find something I know I won’t run out of non-printable parts for. PIXXY appears to be a dead platform at second glance as many of the parts listed for it 404 on me. I’m willing to look into alternative parts for the same platform, though.

***

The first penetration attempt into the field was a big let down. Preassembled drones can run cheaper than the electronic goodies needed to build an open source design, and I am not ready to design my own chassis based off a stripped down model, or even a kit. The experience felt a little… bitter, even if it was only over the phone.

On the other hand, getting a preassembled drone would give me a quicker feel for how a drone is supposed to fly.

Another thing to consider: replacing a drone from a factory will cost more if it breaks than printing up a single replacement part. Besides, one of the rules I laid out for myself is to only use free, open source stuff whenever possible.

***

OK, OK, I gave it some more thought, a prearranged kit (not preassembled) wouldn’t be so bad if all the parts are standardized anyway. I would still want to make sure the parts are ones that will fit with whatever drone I decide to print.

***

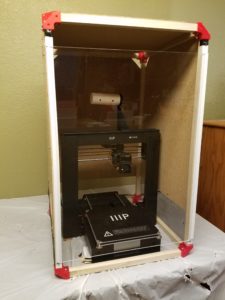
I didn’t seem to come to any substantial conclusions this week, but my father and I did finish the temporary case once and for all. The breathing holes on the sides have window screening stapled to them and we got some cheap J channel to hold the door, which is now a slide up model. Screws hold the rails for the door in place, and a little black duct tape protects the clear panel from further scratches as it slides.
Final Question: If I don’t go with building the Pixxy, what printable model should I go for?

Construction of the 3D Printer Case Part III

Good Morning from my Robotics Lab! This is Shadow_8472, and today, I am finishing my 3D printer’s case. Let’s get started.

Last week, I printed the brackets, and oh, did that thing drone on and on. I’m not looking to print anything else for now, so I finally unloaded the filament and put it away. PLA filament is supposed to be stored in an airtight container, and I am fortunate a gallon Ziploc bag can barely swallow it. One tip I heard when first researching 3D printing before setting the printer up: on the side of the spool, there is a place to feed the filament so it doesn’t tangle while in storage.

Besides the brackets, my father and I are using some cheap wood for the frame and some spare Masonite panels for the siding. The door is being made of an acrylic sheet. Instead of hinges, I’m planning of making it slide out the top.

Construction this time has been much more straightforward than previously. We used a skill saw to cut three six foot pieces of 3/4 in lumber down to size… “Measure twice, cut once.” Good thing we bought extra for stock. Of course, after sending the ‘finished’ pieces back out for a round of quality control on the skill saw, we assembled the frame with the stunted, vertical edges. Those got swapped out after inspection. Had they gone unnoticed, the filament spool would have required accommodation through the roof, defeating the whole point of the project; to keep the cats off the printer.

As stated before, the side panels are fashioned from some Masonite we had occupying garage space. We cut a couple of pieces to form the back, sides, and top of the case. The side and back panels do not reach all the way down. The gap provides access to the power chord, switch, and various ports on the side. The bottom panel is absent; if anything bumps the case, it is isolated from the printer and won’t transfer the shock as readily. The top corners are cut to facilitate ventilation and dodge the corner brackets. The front panel, will be different. My father and I have run out of time this week, but the current plan is to make a panel to slide out the top instead of a hinged door.

Over the course of this project, the materials at hand have not always lent themselves to the exact plan. The hardware store didn’t have appropriate corner brackets, so I ended up printing them. The calculations for the wood for the frame were actually made with the assumption of eight foot pieces, they came in six. It’s only when you look for hinges that you realize just how many choices there are and how many won’t work for you. Roughly nothing about this case is untouched by design revisions.

Final Question: What projects have you adjusted for available materials?

Construction of the 3D Printer Case Part II

This week’s edition is available on my YouTube channel.

Good Morning from my Robotics Lab! This is Shadow_8472, and today, I am printing up the remaining corner brackets for my 3D printer case. Let’s get started.

This week, I decided to explore the different quality settings for my printer’s slicer program, Cura. As I start writing this week’s post, I’m printing out the third of eight corner brackets, each one so far sliced at different quality level. The only obvious difference is the time required to print. As I posted last week, I suspect the raft comes off more easily the higher the print quality, but I’m waiting on drawing final conclusions for now, since the easy raft removals were from .gcode patterns that shipped with the printer and I have no way of knowing what level of quality they were sliced with.

I’m also noticing this webbing stuff across crevices in all three bracket qualities. Judging by the print in progress, I’m guessing the infill is spaced progressively tighter on the higher quality prints, but the official call will wait until I have my final sample. Of note: the printer sounds fairly consistent no matter the printing quality.

***

Progress bars are wonderful estimation tools. The Printer has one. But I don’t think it measures progress in terms of either time or plastic used so far. There are times when it feels like the job is lagging behind schedule as it chugs through big layers only for the progress bar to catch up as it blitzes through smaller, faster layers. I believe the printer is simply measuring percent completion in terms of Z axis progress. Another easily programmable possibility would be to report percentage of the .gcode file executed. But exploring that question should be a topic for another week where I also cover learning the basics of Blender.

With that said, the third bracket just came off the printer. Toward the end, the printer screen dropped the print job monitor in favor of the main menu. What’s going on with that? End of .gcode file? I’ll need to keep that quirk under observation in the future.

***

The webbing seems to be about the same density and strand size no matter what quality I print on. The brackets each weigh in at .7 oz; if they differ at all, I don’t have a precise enough scale to tell. The rafts from high and normal quality jobs came off cleanly within seconds by hand, but the low quality raft split on removal, requiring additional cleanup later. The webs will also require some tools to extract, but the toughest thing about them is the tricky angle for fingers. The infill on the high and normal settings is the same, but the fast print is only 2/5 as frequent. Interestingly, the sides of the normal bracket and not the low quality one, are the roughest. Ironically the top tips of the corners of the “high” quality print didn’t stick correctly and broke off. In conclusion: I’m going to use the normal setting for the remaining brackets.

***

I messed around in Cura some more and I started printing the next two brackets at once. I wonder what the overall quality difference will be. The extruder tip is alternating brackets, laying a layer down on one then the other. It takes a little longer, but combining jobs saves time on resetting the printer. I can only guess that there will be a bunch of webbing connecting these print bed twins.

All the rafts for these brackets so far are triangular, but on all the normal prints, and only on the normal prints, one or two corners of the raft get omitted, including each of the twins. Messing with Cura again, I found the size controls to make objects bigger or smaller. Those get left alone for now.

***

The twin brackets are almost done. They do indeed have a bit of webbing between them, but it isn’t so bad. I’m not sure, but there might be less self webbing per bracket than any of the singles. I’ll need to run many more print cycles to know for sure.

***

Filming for this week’s presentation was riddled with challenges. I tried filming the twins, but I quickly ran out of storage on the camera. Bracket number six was printed on low quality so the camera could swallow filming it  from start to finish. Unfortunately, the sun went down and the lights inside were off, so that take was botched due to low light at the end. The raft didn’t peel nicely either, instead it royally fractured along where bracket met raft. I ended up bumping the quality on the camera down a level to capture the single, normal-quality bracket number seven being printed. After this one is done, I’ll have one more to print up before next week’s topic where I finish the printer case.

***

Final Question: Do you know a lot about 3D printing? What’s going on with all these plastic fibers?

Construction of the 3D Printer Case Part I

Good Morning from my Robotics Lab! This is Shadow_8472, and today, I am printing out the corner brackets of the anti-cat case for my 3D printer. Let’s get started.

The best projects are those that build upto higher existing goals. This week is printing files from online. The Cura software my 3D printer came with is apparently what is known as a slicer. From my research, you can model up any 3d object with as much precision as the limitations of your computer will let you. But in the end, the 3D printer can only print so small. A slicer translates a 3D object file of pure mathematics into a set of instructions for the printer to follow. For the purposes of this blog, Cura is a software extension of my printer.

There are two ways to get the sliced pattern to the printer. SD card, or USB cable. I don’t have enough USB extensions to reach the printer, so I’m operating on SD card right now. I only have one USB card reader on a modern machine, but I remembered one of our old computers in the garage having a multi-card reader. I extracted the module, but quickly learned there weren’t any appropriate internal connectors. The old computer in question was using PATA cables, which look like ribbons instead of the more wire shaped SATA cables of more recent years. Maybe in the future, I’ll see if soldering something up is an option.

I used the rest of my sample filament to print up a potential bracket to hold my 3D printer case. I knew I’d run out before the printer finished, but the sample produced was enough to know a finished version, even one scaled up to be big enough wouldn’t work. Of note, I told Cura to do a fast job on the piece, and I had a harder time separating the raft from the bracket. I’m going to do some more experimentation when I print up the upper corners. The regular print speed is estimated at 6+ hours and the fast at about 3+. Expect the full results next week.

The part I am printing for this project can be found here. The linked page provides the download and says it’s in what’s known as Creative Commons. While I don’t know exactly what that means, I understand it to mean the file creator gives permission to anyone to use their part for whatever purpose without royalties, even if it is part of your product you sell.

***

I have started the first corner, on fast, and it should take between 3 and 3.5 hours. I opened up my first full spool of filament. Setting up this job took longer than expected. First of all, the 1KG spool didn’t fit on the spool rack, so my father and I had to improvise a wide enough one. A more permanent fix may involve printing up a part to fit correctly.

I also had trouble loading the new filament. The instructions said to cut an inch off at an angle, and I did, but it kept having trouble grabbing it. The last, little bit  of the white sample filament was still in there, so I set it up and told it to go. The thing started printing a ghost raft.

The filament wasn’t loaded properly. I tried preheating and loading a few times, but I told it to load, it kept making a clicking noise like it couldn’t grab the end. I had to cut it again at a steeper angle before the machine took it. The extruder oozed a white string that turned red as it went. I was secretly hoping to have the color change happen on the raft for the bracket, but seeing it working correctly was also good. In pulling the tangle away, the hot plastic formed a fine thread, as fine as human hair, though it didn’t feel as strong.

***

Half done, and no major problems remaining so far. I am noticing a bunch of places where the filament is forming like a web in places where it isn’t required. My guess is that’s the fast mode complaining a little. I’ll have to clean the visible ones out. I’m also not getting the Forbidden Planet feeling like before. Either I’m getting used to the sound of the printer or it’s the fast mode. Maybe I’ll print up one on each setting and compare them side by side. Weight, Raft separation, and print time should come into play. I should also take note which corner is which in the case one of them cracks while the case is being assembled or later during use.

Of note, some of my first builds seemed to have some stuff printed into them. I wonder if some stuff from my hands got onto the sample filament and the printer passed it.

***

The print job finished. I’m going to leave the raft on until I have the “normal” and “high” quality prints of the same job done. Final Question: I had to ward my cat off of my printer part way through. Have you ever had a pet almost hurt themselves on a hobby project?

A Summery of Goals

Good Morning from my Robotics Lab! This is Shadow_8472, and today, I am not doing anything too exciting. Just a quick touch up on last week’s topic and then I have some thoughts on building milestones for myself to reach. Let’s get started.

I ended up using the rest of the sample filament on a pair of unknown prints from the sample SD card. One turned out to be a sitting elephant and another was a scaled up version of the butterfly that came attached to the printbed when the printer shipped. Of note, the first layer of the raft was of a different thickness each time. Of course, I rechecked the printbed each print, and I got a little better pseudo-understanding of how the printer in at work is supposed to sound. I’d like to upload a video with a sample, but this week was a little too slow for my intended project.

Future plans. I still want to build and program a social robot, but I definitely need some intermediate steps before I get there. I wasn’t planning on the 3D printer at this point, but since I have it, I’d like to use it. My sister suggested I build a drone, and after rejecting the idea, rethinking it, and deciding it wasn’t a bad idea after all, I decided to research the best one for my purposes.

There is A LOT of information out there about 3D printing drones. Lots of it is up and above my level for now, and since drones aren’t my goal, I’m looking for a lower-cost drone I can print myself. It turns out a lot of the results for 3D printed drones are about getting drones that happen to have been 3D printed. So far, the only drone I have seriously considered is the Pixxy drone. It’s fairly small and cheap to build. Just what I need to learn some stuff from it and move on.

After I am done learning with the drone, I really need to check into learning about ROS. At that point, I should look into learning Gazebo alongside it. Learning some more about Linux, like remoting in to another machine should come in handy for when I build a more advanced bot running Linux with ROS on top.

But everything else aside, I have animals in the house. The 3D printer is a new thing. The dogs went to check it out and seem willing to leave a print job in place for now. My cat Orbit, though, can’t seem to go a day without gettin’ into trouble of one sort or another. The printer needs a case to keep him out. I’m hoping that will be next week’s project.

Final Question: Do you have any experience in 3D printing drones? If so, know any good, entry level ones?

3D Printer Setup and First Print

Good Morning from my Robotics Lab! This is Shadow_8472 and today, I am setting up my new 3D printer. Let’s get started.

Recap for last week’s topic: I put the latest LTS version of Ubuntu on the old Asus machine using my own SSD. The download for latest biannual full version was blocked out for security reasons. Guess what updated this last week! I’m leaving the old LTS version on it for now.

This week, I’m taking a break from sticking Linux on almost everything I touch. I received a 3D printer to further my escapades into robotics and I was instructed to use the printer before the warranty expires. I also received a Galaxy Tab A. I spent a while stress testing and had to exchange it before the return period elapsed. The first unit had a glitchy screen where, about every half hour to two hours, for only two or three screen refresh cycles, the screen would overlap with another version of itself that was shifted up and left when viewed in portrait mode (columns if in landscape). I think it wrapped around to the other corners as well, but it was never on long enough for me to tell. From what I could tell, nobody else complained about it, so it’s likely simply a bad unit. So far, I’m happy with the replacement. On to the printer!

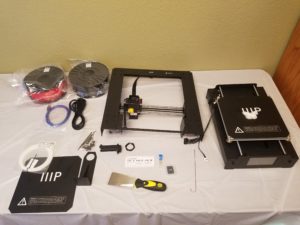
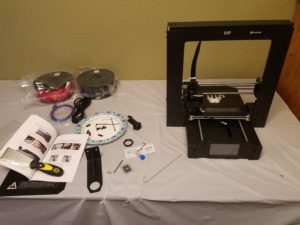
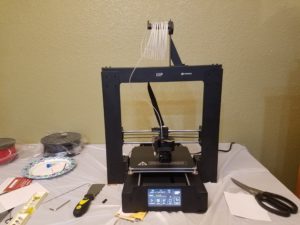
The model is a Monoprice Maker Select Plus 3D Printer. From the information I’ve been given, it should work well with at least Linux and Windows; both are OS’s I use. Included with the gift were a pair of filament spools for printing. The printer itself can do multiple colors, but not more than one at a time, but only if one swaps out the colored spools while printing. Multi-color heads tend to send the price up fairly quickly and most patterns are a single color anyway. I think I will invest time in painting models I want color on.
***

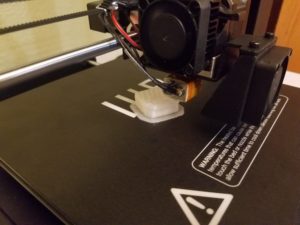
The printer is assembled, but I still haven’t turned it on. I scraped off the butterfly that it supposedly served to test everything out, in the factory I’d think. Disassembling it was fairly enlightening. While 3D printing is less wasteful than machining a similar product, printing is not without waste. A base layer called a raft is lain down first. This seems to serve as an anti-stick measure to the hotplate and a debug mechanism for when first starting a print. The raft peeled off the butterfly itself fairly nicely, almost too nicely; but I’m not complaining.
***

Calibration. Just calibration. That and confusing instructions. While I now have the printer going on its first assignment, the calibration took way longer than the claim of “printing within 10 minutes.” But I suppose I can blame the lab’s folding table uppon which I set it up. I had to re-level that table about three times because when I went back to checking the outer frame, the bubble level said that was out of alignment. The instructions even apologized for showing a wing nut when my model has knurled nuts (ridged like a coin). The picture in question had the latter.

After booting up, the instruction book led me down the wrong menu to bring the extruder to “home” so I could finish adjusting the print bed. That’s when I got to align the extruder so that I could take a regular piece of paper and adjust the table. “There should be some resistance to free movement, but moving the extruder should not cause the paper to be dragged with the extruder.” (User’s Manual p.20) Those two conditions made an infuriating combination. Yes, I understand the need for precision, but there seemed to be a range in which neither was met. Eventually I settled on a reasonable compromise where I held the paper down and moved the head.

Things complicated again when I used their SD card and chose a pattern for a first print job. Either the file names were corrupt and I got error names, or they were simply changed from when the book was written. I took a guess as to which of the four on the card was the 6 min. job, a gear, and came to write this section. It’s been more than 6 minutes, but it seems to either have gone with the second most likely job, an almost two hour vase. Either that or it’s a different pattern for a newer product.

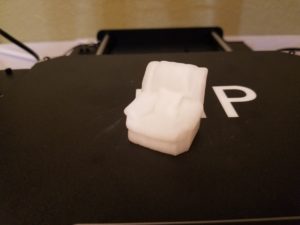
When the printing proscess started up, it sounded like something straight out of Forbidden Planet. The motors are a little hard on my ears, but then again, more than the average number of things are hard on my ears. It’s made some more progress, and it looks like some sort of arm chair so far. I’m using the sample filament that came with the unit, so I hope it lasts.
***

Success. It is a chair. I poked around in the menus a bit more and caused the printer to try tearing itself apart when it tried lifting its z axis too far while looking to unload the filament. It would have been helpful if the thing had told me about its auto-eject for the filament. I’ve also been getting this pretty strong notion that the thing was made in China for China. Any measurements outside the instruction manual are in Celsius or Centimeters, the English is worded terribly in places, and the language selection is a toggle between Chinese and English. And the icon has a character on the top. I’m not offended, just a bit wierded out.

Final Question: Have you ever been given an obvious translation expecting native authorship?

Linux Install: Ubuntu 16.04.3 LTS

Post intended for January 15 2018.

Good Morning from my Robotics Lab! This is Shadow_8472, and today, I am going ahead with installing the older, Long Term Support version of Ubuntu on the SSD I put in the ASUS machine. Let’s get started.

So far, this is an “update” post instead of a “report” post; I plan on posting any stray thoughts worth recording here. I already have the thumb drive with my target version, but I remember Linux complaining before about not having enough space, the install drive only just a little too small. I also remember it seeming to not see the SSD. I will start by looking up the problem.

***

OK, so about right away, I found conflicting forum posts from what to expect. I’m going to need to just try again and poke around.

***

I get to learn a little bit more about formatting. The current formats for consideration are: NTFS, FAT32, ext3, ext4. I know NTFS is a format Windows is happier on, and one source said ext3/ext4 is best for when the drive is going to be used with just Linux, so I think I will format it to FAT32. That is, after I find it.

***

I feel silly! The SSD was connected, but only to power and a loose SATA cable. I spent some time looking for it after bringing up the terminal and using the lsblk command. (LiSt BLocK devices) I connected the drive to one that works and I am working on installing now. I don’t think it will let me choose the format, though.

***

Interesting… the installer crashed. It seemed to want to default to ext4, and I tried to poke around a little for FAT32, but it isn’t worth it. I plan on replacing it with the new LTS version in a few months. Installation is now underway. Looking at the information scroll they have while it installs, they seem to have their own GUI program for getting software. I don’t know if that’s a feature propagated by Debian, Ubuntu, or just super-common to Linux in general, but I am guessing either of Debian or Ubuntu. The install is finished, so I’ll reboot.

***

Funny thing about setting up the BIOS to boot to USB first, you got to remove the USB to boot internally. The reminder to remove the boot medium before a full shutdown was a nice touch that isn’t present with the Ubuntu installer I used. Maybe it’s new and the installer is a bit older. This LTS version is about to be replaced from the most recent after all. I’d have to look it up, but I think LTS versions are given out every five years or so… Nope, every two years with five years support, it would seem.

OK, so I have set up a number of computers with differing versions of Linux, so I think it’s time to take next week off and re-orient myself in where I stand to take on ROS, dual booting with Windows, and server versions. Final Question: I get a bit disappointed when a project misses a long-term deadline. I’m sure if I were to make such deadlines for myself, I might disappoint someone reading. What do you think? Should I give deadlines months in advance, or just work on stuff as I come to it?

Ram Swaparound II

Good Morning from my Robotics Lab! This is Shadow_8472, and Today, I am bringing an underwhelming tale of setting up my “toy” computer. Let’s get started.

I re-scrambled the Ram between most/all of the computers under my care this week. The Linux Mint gift now has all the RAM it came with and the RAM that was originally from the Ubuntu MATE MineCraft Server. I pulled the alleged faulty RAM from the old Asus machine out of my main tower and reclaimed my own sticks. The original Asus RAM was split between itself and the Server after it was all given a BIOS level check.

Long story short, I am tired of doing about everything except shuffling sticks of RAM like a deck of cards. The amount of force required to install the things is a little disturbing when the components around the base are caving in a little more than expected. My RAM is staying where it is for now, and all the sticks appear to work.

I wanted to do just a little bit more, so I started going about installing straight Ubuntu on the old machine to turn it into my “toy” computer despite its random crashes. I have in mind practicing what I think to be dual booting with this machine, so I disconnected the old HDD and it’s RAID SSD “memory bubble.” (Please don’t ask me how that’s supposed to work. I know of about three RAID configurations, and none of them match this setup. I just know that RAID is when more than one storage device is operating in parallel to provide extra speed or redundancy, usually with matched, HDD drives.) I pulled the brand new SSD from my own tower and hooked it up instead of the old setup.

I grabbed my green USB stick with Mint on it and decided to use it for any OS install needs in the future. I put what I thought was the latest version of Ubuntu on it, restoring it to its full 8GB while doing so from when I first put Mint on it to repair the “corrupt” HDD. I connected the target computer to my secondary monitor. I booted it and… nothing. The screen wouldn’t even turn on to access its internal settings when I connected both VGA and DVI to it. It turns out the RAM in the Asus tower was in the wrong pair of slots; RAM slots are paired, and one pair is to be filled first, and I had filled in the 3rd and 4th slots by mistake.

I moved the sticks to the appropriate slots and tried again. I made it to the BIOS where I managed to convince it to boot to the Linux Install Stick. I tried to tell it to install, but it claimed there wasn’t enough space (8. something MB and there were only 8). That didn’t sound right. That’s the size of the USB stick… I ended up making my way to the live environment desktop and was confronted with Unity.

Unity? That desktop was canceled. What’s it doing on the latest… I didn’t have the latest version. What happened? The bootable USB program from the tutorial, Rufus, did request/demand I let it download a couple of extra files just because I was trying to set up a newer version of Linux than the one it seemed to come with… I poked around on the Ubuntu download site I got the ISO from, and found the latest version unavailable, and had instead gotten the latest LTS version. Long Term Support was a term I learned quickly. It turns out the actual latest version was blocked due to security concerns with the all three common CPU architectures affected. I decided to put the project off a week and see if a new build comes through.

In the meantime, my Final Question: If you use Linux, what desktop do you use?