lootRepair0.3

Good Morning from my Robotics Lab! This is Shadow_8472 and today, I am reviewing my progress on the lootRepair program from my previous two posts. Let’s get started.

I started this iteration of the program with a major paradigm shift. My first two attempts at the program could be modeled as following a coded track. I gave up when I had trouble tracking down too many bugs when I tried to break my second attempt.

My new version has two phases in its main loop: a getState phase, and an action phase. The getState phase takes a look at the turtle’s state, and the action phase acts on that phase, handling the upstream redstone output, weather or not to wait on an event, and there’s even a spot where I can put extra code; all of which were previously handled with multiple instances of redundant code, each copy of which had to be visited when a change was made to one of them. I think of it as a state machine, but I’m not exactly sure if that’s the proper name for it. Whatever the case, the debugged product should be able to handle me giving it more abuse with less patchwork.

Building up the code to check for a crafting table took four attempts before I came up with a version that wasn’t too ugly to follow, and then one still needs to know what they’re looking at. Early startup() attempts were based on “use the correct tool, turtle.getItemDetail(n)[“name”], and baby its weak spot, (possible crash from a nil return)” ideas, so I ended up using the slightly slower, but more ingenuitive approach, try to equip each item in the turtle’s inventory and see if it can craft if something equips. Keep track of if and where a workable slot is found, and try the other equipped slot. (There’s a bug where crafty turtles forget their crafting benches, but they work after unequipping and reequipping them.)

As of right now, I still need to finish debugging it. When I transferred my Notepad++ generated document and stuffed it in the ComputerCraft folder where executable programs are stored, I got a bunch of errors and wide gaps where lines of code should be, or more likely, they are some other character interpreted as a line feed. After all, the CC editor doesn’t use proper tabs, maybe something else is messed up.

I’ve been editing the original program in parallel as I debug the in-game version. It’s a little redundant, but I really want to publish this some time here, hopefully next week… if I don’t take a break and blog about something else.

Final Question: Do you know a lot about ComputerCraft? Why is the turtle glitching its crafting table away on chunk reload?

Turtle Program Rewrite

Good Morning from my Robotics Lab! This is Shadow_8472, and today, I am reporting my progress once again on my lootRepair program. Let’s get started.

Last week, I left off with my discovery of the failed premise of my first program. It works well enough if treated properly, but the core function, turtle.craft(), didn’t behave as nicely as I would have hoped in unexpected situations. My whole design philosophy was

1. Wait for an item to be shoved in
2. Make sure everything was all good to craft
3. Craft
4. Output
5. Check inventory for any more items to evaluate
6. Repeat

Problems arose when too many items clogged up in the turtle inventory at once. My new design will focus around a turtle opening itself up for an item when it’s ready and closing itself up again when one arrives. Hoppers shut off when powered, so I’m going to have the turtles follow the same protocols. While I’m at it, I want to make a second signal so the turtles can activate an error mode and turn on a light when there’s a problem.

This re-write, I want to actually write my program in such a way that it will be a versatile, well written program. Good code is easier to maintain, though it might be harder to write at first.

I started the rewrite by opening Notepad++, an awesome plaintext editor for Windows, and wrote my program in what was supposed to be pseudocode, but ended up growing into attempted proper Lua. Funny how a better tool can clear the head, because the editor that came with ComputerCraft does not have cut and paste, and when I developed several functions and wanted to order them according to other functions each one calls, retyping a chunk of code longer than a few lines gets a bit discouraging.

I transferred the files to the server computer and onto the very in-game disk I was using for my computer setup. Once again, I ended up in the same low-end, default editor for debugging my program. Admittedly, my program is still incomplete. At this point, I’m not even sure if it has the “next item” code correct.

One thing I do like about my working prototype program is how I can hot swap items… I just had an idea, but implementing it might involve rewriting the way it’s supposed to work, but maintenance should be a bit easier. Right now, I have the turtle’s state follow a cascade controlled by a series of spaghetti-code if-then statements. My new idea would have the main loop get the turtle’s state each event and act on that. I don’t even know if it’s reasonable. Honestly, I think I should be fine with my working prototype and another turtle to regulate the item speed, but I want to publish my code here.

Final Question: A good artist of any discipline should be able to work with any set of tools they have to work with. When you don’t care about formatting, or wish to avoid it, what plaintext editor do you use?

Incompetent Rudimentary Functions

Good Morning from my Robotics Lab! This is Shadow_8472, and today, I am reviewing my progress with programming a ComputerCraft Turtle to craft like items together for repair purposes. Let’s get started.

The program I spent my week putting together is supposed to:
1. Make sure its environment is good.
2. Ensure it is working with matching, non-stackable items with durability.
3. Reject items that don’t work.
4. Craft valid items together.
5. Accept like new items once they are mended.
6. Be able to handle being unloaded and restarted from any state.

I started out with my code, building up the lower level bits and moving on to the higher lever functionality. Whenever I had a question on how something was supposed to work, I quickly made a tiny program on another computer to test the syntax or output format.

I designed my virtual workstation around this philosophy, and ended up with a main computer with a large screen on one side for viewing code at once, and a disk drive on the other where I save all my programs. Other computers, almost always turtles (robots), can also access the disk drive, and since I can’t properly test my turtle program on anything but a turtle, I end up saving my program from the larger terminal and testing it on a turtle attached to “A_drive” (Named for the in-game representation of a floppy disk drive). Later in the debug phase, I ended up building an even bigger monitor and using a network cable. I logged another avatar in and pulled the keyboard over so I could edit with a little more area than the advanced computer.

As I went, I had new ideas on how to do things, and do them better. But toward the end, those ideas were a little too low level to implement, so I just shelved them. Bug testing is important, especially when your program is intended for deployment on a fleet of identical systems and you don’t have an “update all” option. I eventually finished my program and started bug testing. An attempt to call nil proved to be a typo in a function name, in this case a lower case ‘i’ as in getitem() where the function was named in camel case: getItem().

One of the methods of making a good program is doing it over again once you’ve finished it. I learned that lesson when another bug popped up where it shouldn’t have. It turns out the function, turtle.craft(), needs a little more babysitting than I gave it credit for. I never really understood this low-level function, but knew it could pull off amazing feats if controlled properly. The documentation said it could craft any item as if on a regular crafting table, but extra items present in the recipe were okay. I understood my bug when I made a tiny test program to tell me if things could be crafted at that moment or not. The turtles’ inventory is a 4×4 grid and a crafting table is 3×3. But turtle.craft() apparently doesn’t like it when things in the inventory can’t be fit into the crafting table’s smaller area when is called to try and craft something.

The next step is to reprogram what I already have, as stated above. This time, though, I want to have that tighter leash on turtle.craft(). While I’m at it, I intend to implement a low-level error code to make maintenance of the system a little easier.

Final Question: This LootRepair program is the most complex program in the suite of programs for my mob farm automation. What features should I include in a future release if I ever publish this program?

The Hazards of Programming Nicely

Good Morning from my Robotics Lab! This is Shadow_8472, and today, I am returning to the modded MineCraft world where I am working on exactly what I said I wanted to move on from last week. Let’s get started.

The smeltery program I wrote for last week was nice and all, but it had a bunch of potential improvements. For one, it was blind to its environment. It could only send out pulses when it was time for the next one. Plus, with the “analogue” capabilities of the regular computers, and my previous experience with dealing with analogue redstone, I was tempted beyond my ability to resist to tear out some space around the smeltery and upgrade the hardware.

Observer blocks were capable of giving off a pulse when a basin or table was filled and quickly emptied by a hopper. There are six sides in total for the computer to work with, but the front is on display and the top of this one is occupied with another block while the tight quarters makes threat of cross wiring redstone lines very real. Given these limitations, I set about working on a new setup capable of taking advantage of  the rs.setAnalogueOutput(string side) and rs.getAnalogueInput(string side) functions.

While I was working on the new hardware, I decided to combine the programs, and add functionality so I could pour from both places at once. I set to work with three modes in mind, meant to run almost the same code at once: “Basins”, “Tables”, and “Both”. (For the aspiring coders and grammar critics, the punctuation outside the quotes is intentional; the quotes mark the beginning and end of strings, or lengths of characters (a single symbol like a letter or digit).) The code quickly became messy, and I started going into writing functions to modularize the more deeply nested segments of code. I used a little trick I learned while writing assignments in C++ where I made a comment consisting of the comment character such that it covered a line of the editor.

//////////////////////////////////////////////////////////////////////////////////////////////////////////

The section break I just put in works in C++. Unfortunately, when I tried the Lua equivalent, WordPress changed the repeated — into a single line. Anyway, the trick is that after the comment signal, the rest of it can be either an odd or even number of character repetitions, even if the first  is double. The trick helped a little, and I pushed on, working from the extremities of the code to the main loop until I realized a bit of a mistake.

My original program was designed to loop over a number of pours to a single output. I wanted the new program to handle both at once and possibly more. I was nearing completion when I when I came to halt. The main loop was incompatible with handling both outputs at once. Ouch!

I went about redesigning it in my head, but the project just kept inflating and inflating. Soon enough, it was too big without additional notes, so I just modified my old program to work with my new hardware. Funny, how an estimated one day project ended up taking half the week and it wouldn’t have worked anyway. At this point, I am content to just leave that as it is. The hardware is set up such that the computer can tell which set of outputs to trigger and which outputs are responding, but the program doesn’t use the full functionality.

/*********************************************************************************************/

Another example of my section break for C++. This one uses the long comment format. I’ve thrown together a few more programs, but nothing amazing, and nothing refined. I have noticed a consistent pattern: once I get the code working, I want to make another, better version. ‘Maybe if I just make it do this a little bit differently…’

For my automated skeleton grinder, I already have coded up the turtles to kill the skeletons. They aren’t perfect, but they sort out the unstackables by themselves. I also learned a little more about their inventory management, so I have another idea on how to make them handle better. Besides, I also want to use more turtles to move the items about better and free up the attack turtles to actually do their main job.

My goal for this week is to fully automate the farm, at least in code even if I don’t get a presentable design in order.

Final Question: Problems can usually be solved from any different number of angles. What was the last time you scrapped progress in favor of an easier approach?

Programming for a Virtual Environment

Good Morning from my Robotics Lab! This is Shadow_8472 and today, I am taking a field trip. My sister set up a modded MineCraft World, and I am into the ComputerCraft mod. Let’s get started.

ComputerCraft is a MineCraft mod that adds computers that run actual code using Lua, a scripting language. While a lot of programs are written, compiled (turned into something the target machine can run), and executed; scripting languages are more often just run off the text file as written. They will be slower, but easier to write.

ComputerCraft itself adds basic and advanced versions of both regular computers and their robot counterparts or “turtles” as well as a few other peripherals. All computers come with a Command Line Interface. Advanced computers will even let you use your mouse and show you colors while editing a program. Nevertheless, it’s the perfect mod for dealing with computers from a programmer’s point of view. In a multi-player environment, one might even get into hacking other’s networks while defending one’s own with encryption.

One mechanic within MineCraft proper I will be relying on is redstone. Think of it as a simple wire. Signal in one end,

I have dealt with ComputerCraft before. It was a few years ago, but it’s not totally new to me. Back then, I was a complete stranger to Lua and was only interested in the early game mining abilities. Other stuff was a little low level for my patience. I eventually set to modify the code for a mining turtle’s default pit digging program. In my research before reprogramming the turtle, I did not find the copy command, so I retyped the whole thing in myself before attempting the modification. Not a smart move without a second screen. But I did get the gist of the syntax of Lua and an insight into how the program was structured. It was a good way to learn the language.

In the present, I am looking to use in-game computers to manipulate the world in more ways than just mining it. I have already used a script to automate a tedious task from another mod, in this case Tinkers’ Construct, where I would otherwise have my time taken up by micromanaging the pouring of blocks and ingot casts. It provided a refresher course on programming and in Lua in particular.

I started with a description of the problem: Automatically pour from the smeltery. I formed a mental picture of how I wanted the program to do it: Send redstone pulses to the appropriate spouts. At this point, I start mapping out the logic of the system. Normally, such a stage would be done on a whiteboard or a piece of paper, but this was a small enough job, I broke good programming practice and skipped this step.

Coding the smeltry program was fairly easy. I pulled up the source code for the default mining program on my second screen and referenced it for syntax. I usually find examples a lot easier to follow than a paragraph explanation in some documentation.

What I do find helpful is bringing up the API’s (Application Programming Interface) for ComputerCraft elements I’m working with, so I can see what variables of what types the lower level functions want and in what order they want them. Think about it as tying an extra fancy knot and someone gives you a box of strings so you don’t have to make your own rope.

Debugging for the smeltery program wasn’t the smoothest. A programming practice I failed to follow was postponing the debugging until the program was fully written. I don’t like syntax errors. I don’t remember all the errors I had, but one of them stuck out as being stubborn. I eventually got it figured out and I could start debugging the logic.

The completed program has two inputs, both integers. The first is how many pulses to send, and the second is how long to wait between each pulse, as the a premature pulse can stop the flow. The final smeltery has two copies of this program, each a slightly modified to send the pulse to the correct place. Now that I think about it, I could have combined them with an in-program menu. Of course, I could always make it fancier and fancier, but it works for now, and I want to work on other things.

***

What? I underestimated the basic computer’s abilities. It CAN use analogue redstone signals. I will have to take advantage of that later on…

Final Question: Have you ever overestimated something and later took advantage of the previously overlooked abilities?

Changing an Ubuntu Interface

Good Morning from my Robotics Lab! This is Shadow_8472, and today, I am going to change the interface on my Ubuntu Machine, Derpy Chips, from Unity to… something else. Let’s get started.

From my last post, I broke from my usual methodology and gave a nano update after my final question. Unity had decided to zoom in on its interface again, and I am not a fan. Besides, having grown up on Windows, Unity wasn’t doing it for me. The tower I set up as a MineCraft server has the MATE interface and my father’s Christmas present has Cinnamon. I’ve been able to work with those. Their OS’s came with those environments. So, this week, I’m going to learn a little more about what’s available in terms of GUI’s (Graphical User Interfaces) for Ubuntu and see about altering mine.

Wikipedia is a good place to start. I won’t get any final answers there, but I’ve already done some preliminary research. Warning: Terminology Overload Incoming. I’ll try to use searchable Wikipedia page titles for terminology, but I can’t list everything. I started at Unity, read a bit about it, and browsed past GNOME, the interface Ubuntu is looking to change to as a default, to Desktop Environment and Graphical User Interface and Shell. I need to do my self-assigned reading on my terminology so I’m not misinforming you later.

***

Shell: This is typically a user interface designed as a go between the operating system and the user.

GUI: Graphical based shell.

Desktop environment: computer GUI modeled after a real desk, presenting information as if on digital paper or windows.

After looking through a few options, I am opting to try installing the Cinnamon Desktop environment on Derpy Chips. The reason is that I intend to later update to the latest LTS version coming out at the end of the month and they will have GNOME 3 as the new default environment. I don’t believe it is actually a desktop environment, and if I don’t like it, I can just go back to Cinnamon or whatever I go with now.

***

I installed Cinnamon, and it was actually almost painless. I did a quick search and fount a blog LINK. The desktop came back at a civilized resolution with respect to the different interfaces. I did forget to follow the final instruction and switch between the installed environments, but it wasn’t too hard to finish.

When I got in, it was pretty basic. It didn’t remember my lefty mouse settings, and there was no default background image. I’m not sure I like the windows, but I still need to play around with the appearance settings. At least it remembered my installed programs. I’ll spend some time moving in and possibly give a report. Just now, as I was typing the last sentence, the basic screen saver activated, a military time clock, and as I was typing this one, it started flitting about the screen. I can’t say I like that one. Just another thing to play around with I guess.

Final Question: This week I solved a problem by going for a completely different solution. Have you ever done likewise?

A return to Linux Tech Support

Good Morning from my Robotics Lab! This is Shadow_8472, and today, I am trying to install an old favorite game of mine, Sim Coaster, onto my Linux test machine, Derpy Chips. Let’s get started.

As a note, while trying to get this game to play again, I have come across documentation calling it Theme Park Inc. I believe it’s the same game except just outside the US, so in my research, I am paying attention to both titles of the name. On the other hand, this game is not Sim Theme Park.

I believe I have talked about Wine before, but since it’s been a while, Wine is a compatibility layer between Linux and programs meant for Windows; meaning when writing software for a particular OS, you can expect certain chunks of code to be there. Linux would lack any of those “libraries” of code written for Windows, but if something were there to provide the same functionality, the CPU could still run the program.

Now, this all sounds great, but due to the branching version nature of Linux, it is really hard to find the correct, decent help. You might stumble across some workable instruction set right away, or you might goof something badly by following advice meant for the next game or Linux version over.

That’s about where I am with getting Sim Coaster to run right now. WineHQ says it should install and run perfectly (all be it based on a single, old report). I have it installed, but it isn’t working. Apparently, my old favorite has a number of similar enough (and more popular) competing games from the same era that Coaster doesn’t have a dedicated support section.

In an unrelated incident, my Derpy Chips computer lived up to its name, but not the way it earned it. While getting ready to set up a modded MineCraft server for use my my family on Sabbath, the screen zoomed way in, the Unity interface’s side bar taking up a quarter of the screen. The graphical interface was useless; I ended up opening up a terminal and tried to use my Windows machine to look up a fix, the xrandr command. Nothing seemed to come of that, but I swapped around my monitors until I seemingly fixed it, but I ended up giving up in defeat and putting it on the server machine when I put the screens back to their respective computers. (Normally the Windows machine has the HDMI and a smaller screen on DVI, but Derpy Chips gets the DVI when I’m using it.)

After Sabbath, I came back to the Derpy Chips problem to unscramble it, and it was all fixed. NOTHING is more frustrating than an evasive solution that comes on its own, at least for now.

Final Question: Have you ever gotten something working on you when it shouldn’t?

***

GAAAA! Zoomed in interface is back!

Ya, I can fly.

Good Morning from my Robotics Lab! This is Shadow_8472, and today, I am reviewing my first full week with my fancy new drone. Let’s get started.

My rough learning curve went about like so:
Uncontrolled hover-bounce at ground level (Perfect for tangling the propellers)
Race car around the house
Learning trim to balance the controls
Uncontrolled elevation introduction (Perfect stage for crashing into objects and causing damage to the drone)
Uncontrolled Yaw (left/right) introduction (Perfect for disorienting you if you aren’t careful)
Teaching sister what I knew, only to feel showed up
Early use of the flip functions
Understanding of the trim controls
Hover refinement
Race drone around the house
Finer movements

Getting the second battery was a really good idea. Sure I didn’t have a second charger, but it made for a longer flight session when I just had to swap the battery out and they were both charged.

Early on, when I was still getting used to the controls, I tried dodging the drone and catching it… OUCH! The throttle wasn’t down in time. I still have the remains of a tiny blood blister on my right ring finger.

Flying the drone across the ground actually reminded me of a favorite Star Wars podracing game I used to love. Technology marches on, I guess, unless I can get it running in Wine on Linux some day.

Crashing and bending a blade does not mean a drone is unflyable. You just need to adjust the trim and keep learning on the damaged gear. My two front propellers each have nicks and a back one has a bend in the plastic.

It’s a good and fortunate thing both my batteries were discharged at one point. One of them turned up after being missing and it had a fresh puncture in it. I am thankful to God none of the animals got hurt and our house didn’t burn down, but I am still a bit emotionally charged at losing a battery. At least the event triggered me to go get a binder for some drawings I made up as part of a role play.

Nothing groundbreaking has happened since then, I continue to get better, maybe I can try out the level 2 maneuverability settings, but I haven’t given that much thought yet. I have enough control to usually land on someone’s FLAT hand if the drone is flying propellers up, but I still goof the drone into something every so often. I’ve tried interacting with the animals with it, mainly by blowing some air their way, but I don’t feel that is wise after my dog tried to catch it mid-flight. I tried to dodge, but he was faster and I had to cut the throttle.

Final Question: Ever have a side project crash one of your problems and move you to fix it? If so, what was it?

Early Experiences With a Drone

Good Morning from my Robotics Lab! This is Shadow_8472, and today, I am introducing myself to the world of drones. Let’s get started.

While my ultimate goal is to print my own drone, I decided to try have my first flights on a pre-built machine. That way, any observed mistakes should be user error. I visited a local hobby shop for a fairly cheap drone. Nothing too fancy, the Invezo Stunt Drone RTF. Mine doesn’t camera but it is supposed do flips mid-air.

It was an open-package deal, so I got a significant discount. I had a short first flight, during most of which I let my sister borrow the controls. All of a sudden, it quit. Low Voltage Cutoff (LVC), I later learned. I unplugged the battery…

The black wire separated from the plug. Sure, I could just stick it back in there, but that’s not how it’s supposed to work. I did that a little, and got the USB battery charger plugged into a USB rapid charger. I read through the manual, where I learned about LVC and not to over or under charge the battery. I tried running it with the wire loose, but the drone wouldn’t respond to the controls.

Later, my father and I went in to repair the loose wire. I examined the tiny piece and concluded the pins could come out for service, but my father obviously had had some experience with such a plug before, so I followed his lead and we jammed the wire back in and pushed on the exposed part to crimp it back together…

After butchering the repair job, we took the drone back in the next day. I told them the situation, and they confirmed my suspicion about pulling out the pin to repair while making me feel like a fool by demonstrating its ability to obey the controller. We bought a replacement part and a spare battery.

The repair went more smoothly than we prepared for. First of all, the soldering iron came in and was brought up to temperature. I pulled out the pins for the replacement socket and swapped them so red would still be going to red and (blue) would be going to black.

After playing with some shrinkwrap wire jackets, I idly tried the old, good pin from the red wire, and it worked with the new socket. I used some wire cutters to cut into the old socket again and retrieved the other pin. That pin was the hardest part of the repair. My father sent it flying twice while trying to hold it with the needle nose pliers, and both times, I found it within seconds, the first time, I heard it hit the hardwood floor. The second, I spotted it in my lap on the way to look for it on the doormat.

We ended up pulling a three handed operation and crimped the old pin onto the old wire and after I had given up on account of it being squished just a little bit too far past the crimp proper, my father managed to get it stuck in there.

I had a battery on the charger, this time in an actual computer (The old machine I gave my new SSD to and named Derpy Chips (I was wondering how long it would take someone to notice the name…)), like the shop guys said. I charged up one battery, then the other and started flying the thing around the house.

Drones are clumsy. At least at first. Elevation is super hard to keep steady, as are forwards and backwards. There is supposed to be some adjustment available on the controller for each axis of motion (Forward and Backward, Left and Right, and Yaw(rotation) left and right.), but throttle is on the pilot.

Running into obstacles seems to be a staple of learning to pilot a drone. This is where this model’s ability to flip comes in handy. Every little nick messes with the rotation, such that I lost track of where what part on it was facing. The orange and black propellers help point forwards, though.

Hair in the propellers seems to be worth a paragraph in and of itself. Hair gets stuck, it stops the propeller, the drone stops. A partial slow is also possible, though, and can introduce an annoying, diagonal drift in your otherwise perfectly balanced hover settings.

Problems aside, my family’s small dog took an interest in the tiny hovering creature, going so far as to try to socialize with it like a cat. While curious about it, she didn’t appreciate it approaching. If she got too close, I could just jam the throttle up and get it out of the way.

Final Question: What is a favorite time one of your animals interacted with your technology to humorous ends?

Massive Print Job

Good Morning from my Robotics Lab! This is Shadow_8472, and today, I am playing around with my 3D printer a little more. Let’s get started.

So, I’ve been watching Tango Tek, a Youtube personality [Link to his YouTube], off and on for a few years now. I’m currently a member of his Patreon MineCraft server and there’s a meet n greet for his patrons coming up (already past as of posting). I wanted to make a little something to give him, so I started with pocking about in Blender and turned Tango’s logo into a neat, little coin.

The 3D model is fairly simple. I took a short cylinder and carved the double T into a flattened sphere. I then overlapped the two, selected both pieces, and exported to .stl.

I found an acceptable use for the fast print. For my first coin I sized the print at 1 in. diameter. It didn’t look the greatest; but I figured that was because the printer doesn’t have the finest resolution on the layer thickness, and a 3 inch one I wanted to make would be fine.

Wrong.

The big one suffered from the same aesthetic problems. I ended up going back to Blender and reworking the cutout sphere. Stretching it into a more pronounced dome, I exported again.

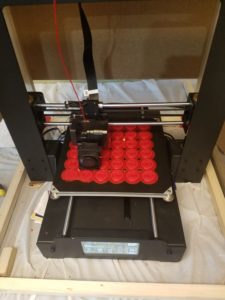
I did a pair of test prints and decided the 1 in. coins would be neat to hand out to everyone at the meet and greet, so at present, I’m printing up 36 of them at once. The raft is finishing up, but there are two spots where I think the coins will be lost. The first little bit of the raft just didn’t stick in that area. If those were solo prints, I’d abort them, but I’m not going to do so at the cost of the others.
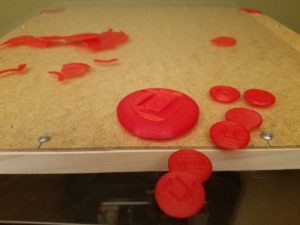
I did what I could and cut away the bumps where the raft didn’t stick correctly. I had to work on the raft while the printer head was in motion (the left and right axis) because the pause feature parked the extruder head right above the damaged sections without a chance to get under them. Update: another layer on the raft brought the bumps back. With the bed moving this layer, I can only hope the defect doesn’t cost the other coins.

***

The printer finished after going all night and into the next afternoon. Three of the coins didn’t turn out well enough to give away. One didn’t even come off the raft at all. It turns out I was rushed in setting up the print. The close, left corner was aligned too low. That’s why the first layer of the raft didn’t stick. But in failure, I learned a little more about the structure of the raft. The outlines serve as a base for the first layer and so on and so forth until you get to the product.

As an extra little stunt, I’m making an extra, 3 in. coin along with a few smaller coins to replace the goofed ones and bring my total good coin count to about 40.

***

My stunt failed. I think the way I modeled it is to blame. The middle detail between the relief peeled. One of the eight smaller coins didn’t peel from the raft. In the end, I’m taking 42 coins to pass out.

***

I don’t have time to remodel. As a last ditch effort to make a bigger one for Tango, I’m printing up three 1.5 in. coins. *** Nope, they didn’t work. The printer switched to a short infill based layer to finish the dome. That’s why all my big ones and the very first prototype were goofs. Other than that, I would rather both T’s be of equal depth. Something must have gone accidentally right half way when modeling these.

***

The Tango Tokens were a hit. Even though they weren’t perfect, they made for a cool, little souvenir for everyone. If I ever make more, I will want to remodel the coin and fuse all the pieces before they leave Blender. The printer was printing an internal membrane which led to the weak spot. On the other hand, maybe I can label future tokens with the event meetup. When I hold pretty much any 3D printed object to the light, I can see the infill lines. I want to try inserting a label in there to differentiate the production runs.

Final Question: have you ever made custom party favors, if so, what? And what for?